
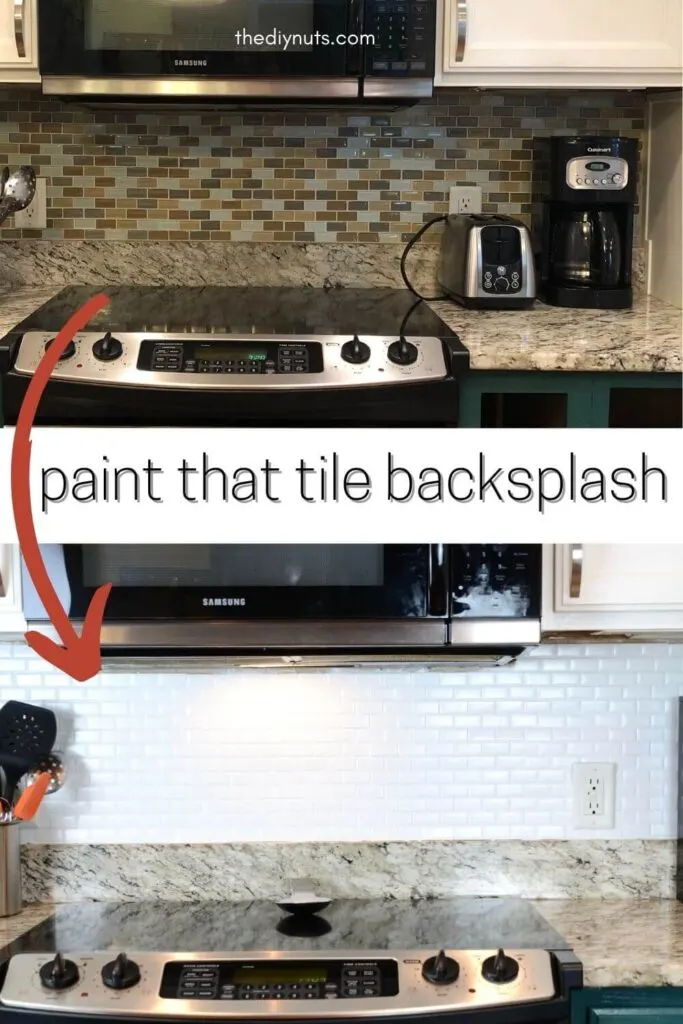
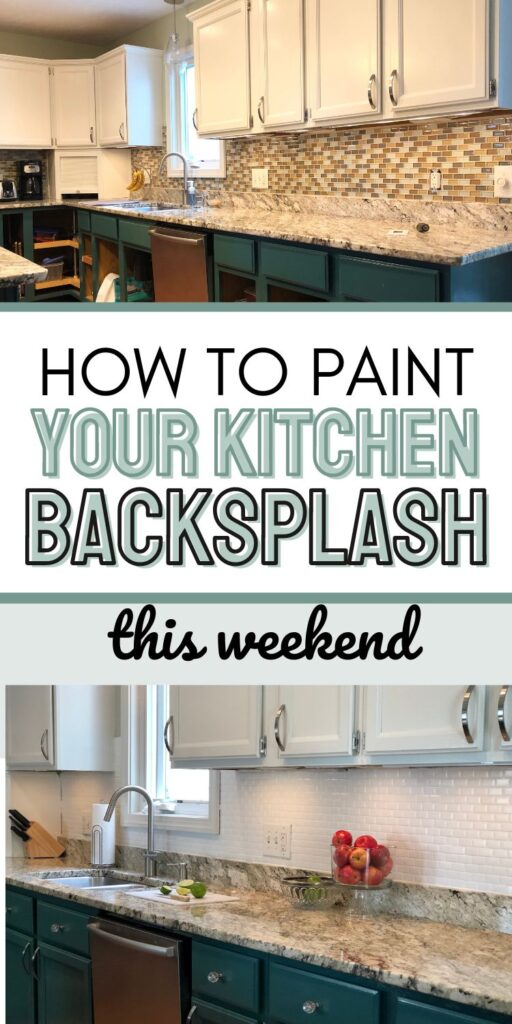

Do you want to get an updated kitchen backsplash without tearing your old one out? This is one of our favorite DIY kitchen projects. Use our step-by-step tutorial to easily update your backsplash tile by just painting.

*Disclosure: I only recommend products I would use myself and all opinions expressed here are our own. This post may contain affiliate links that at no additional cost to you, I may earn a small commission. Read our full privacy policy.
If you are looking for a budget and beginner-friendly DIY, then this tutorial is for you. This was such an easy and quick DIY home project. The only thing that took the most time was the dry time. We have around 20 square feet of tile and this tile painting process was easily accomplished in two days.
And for us, we knew that if this didn’t work we needed to replace the tile anyway. It was totally a risk we were willing to take.
Table of Contents
Can you paint glass tiles?
Yes, you can! I honestly cannot believe how easy and quick it was to paint the glass tile. Proper cleaning, prep, and using the right materials will make your painted tiles last a long time. I wish I would have done this DIY years ago.

Our “Before” Tile
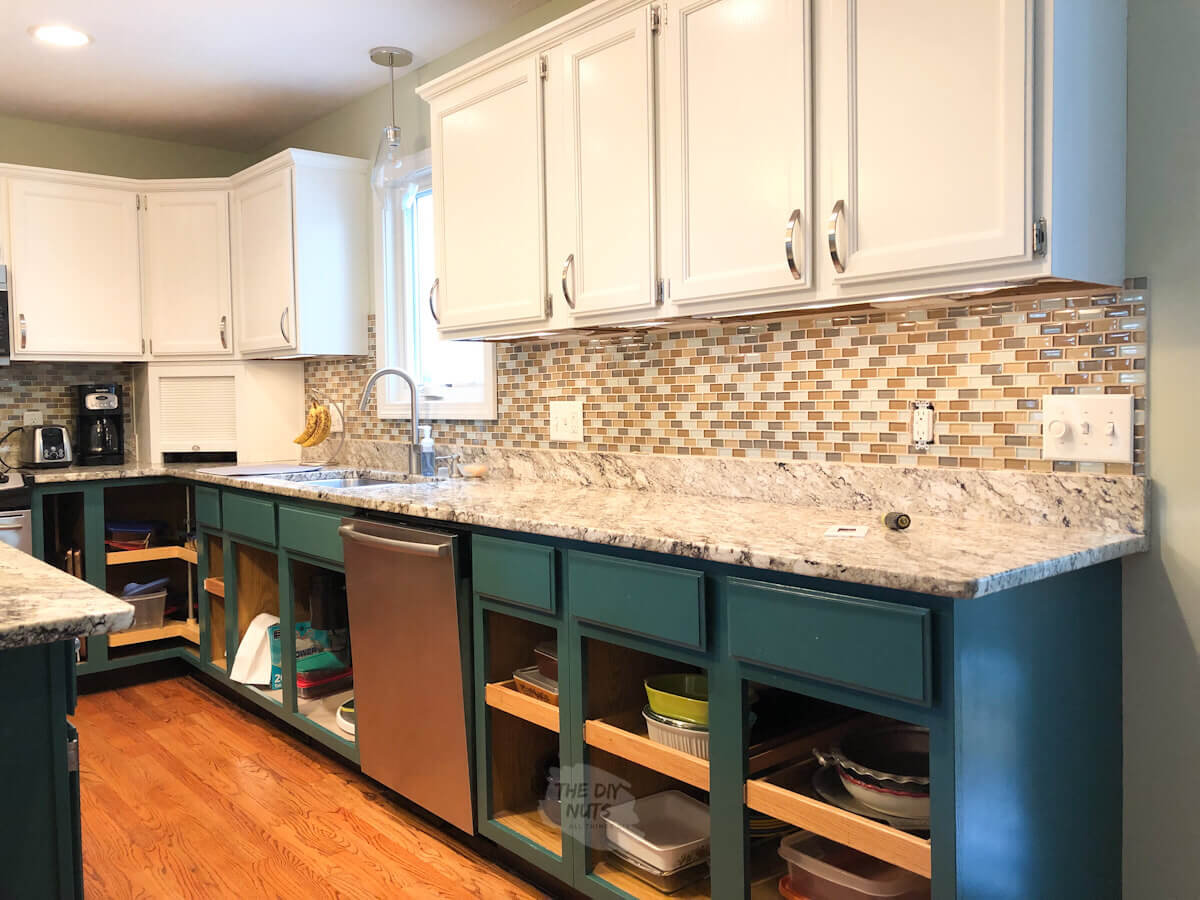
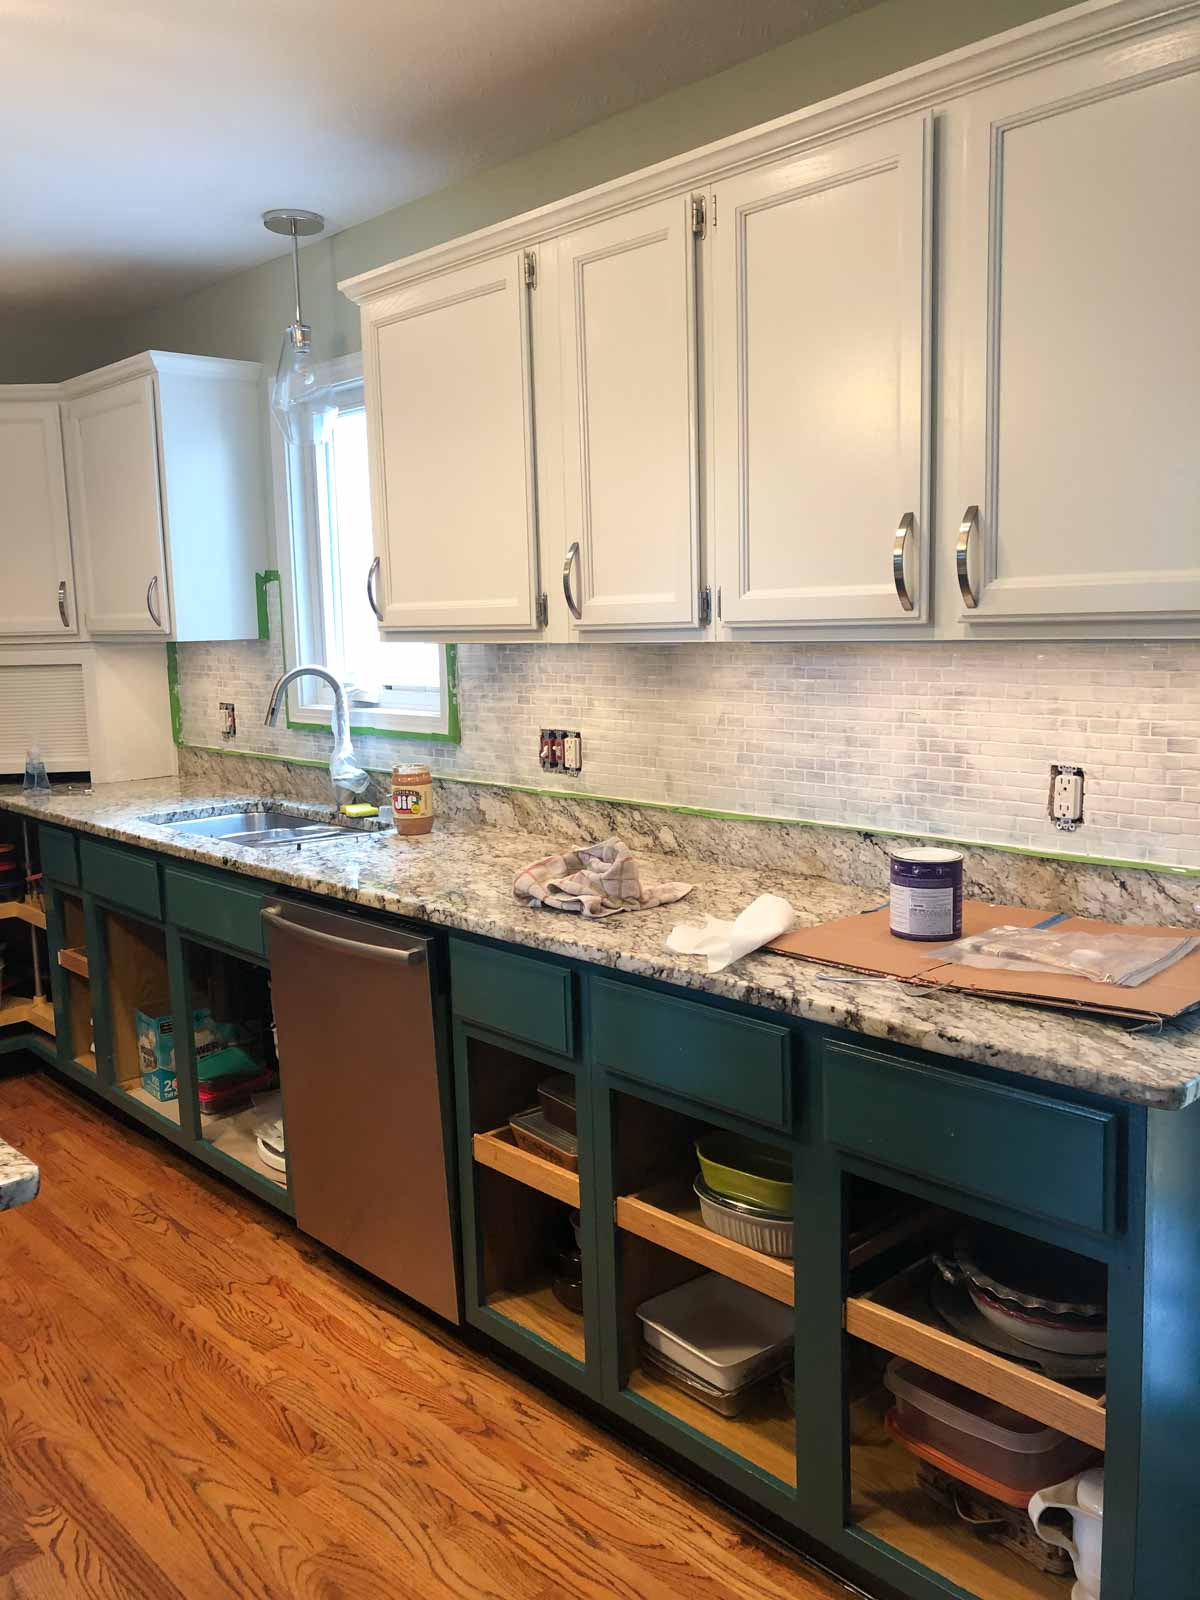
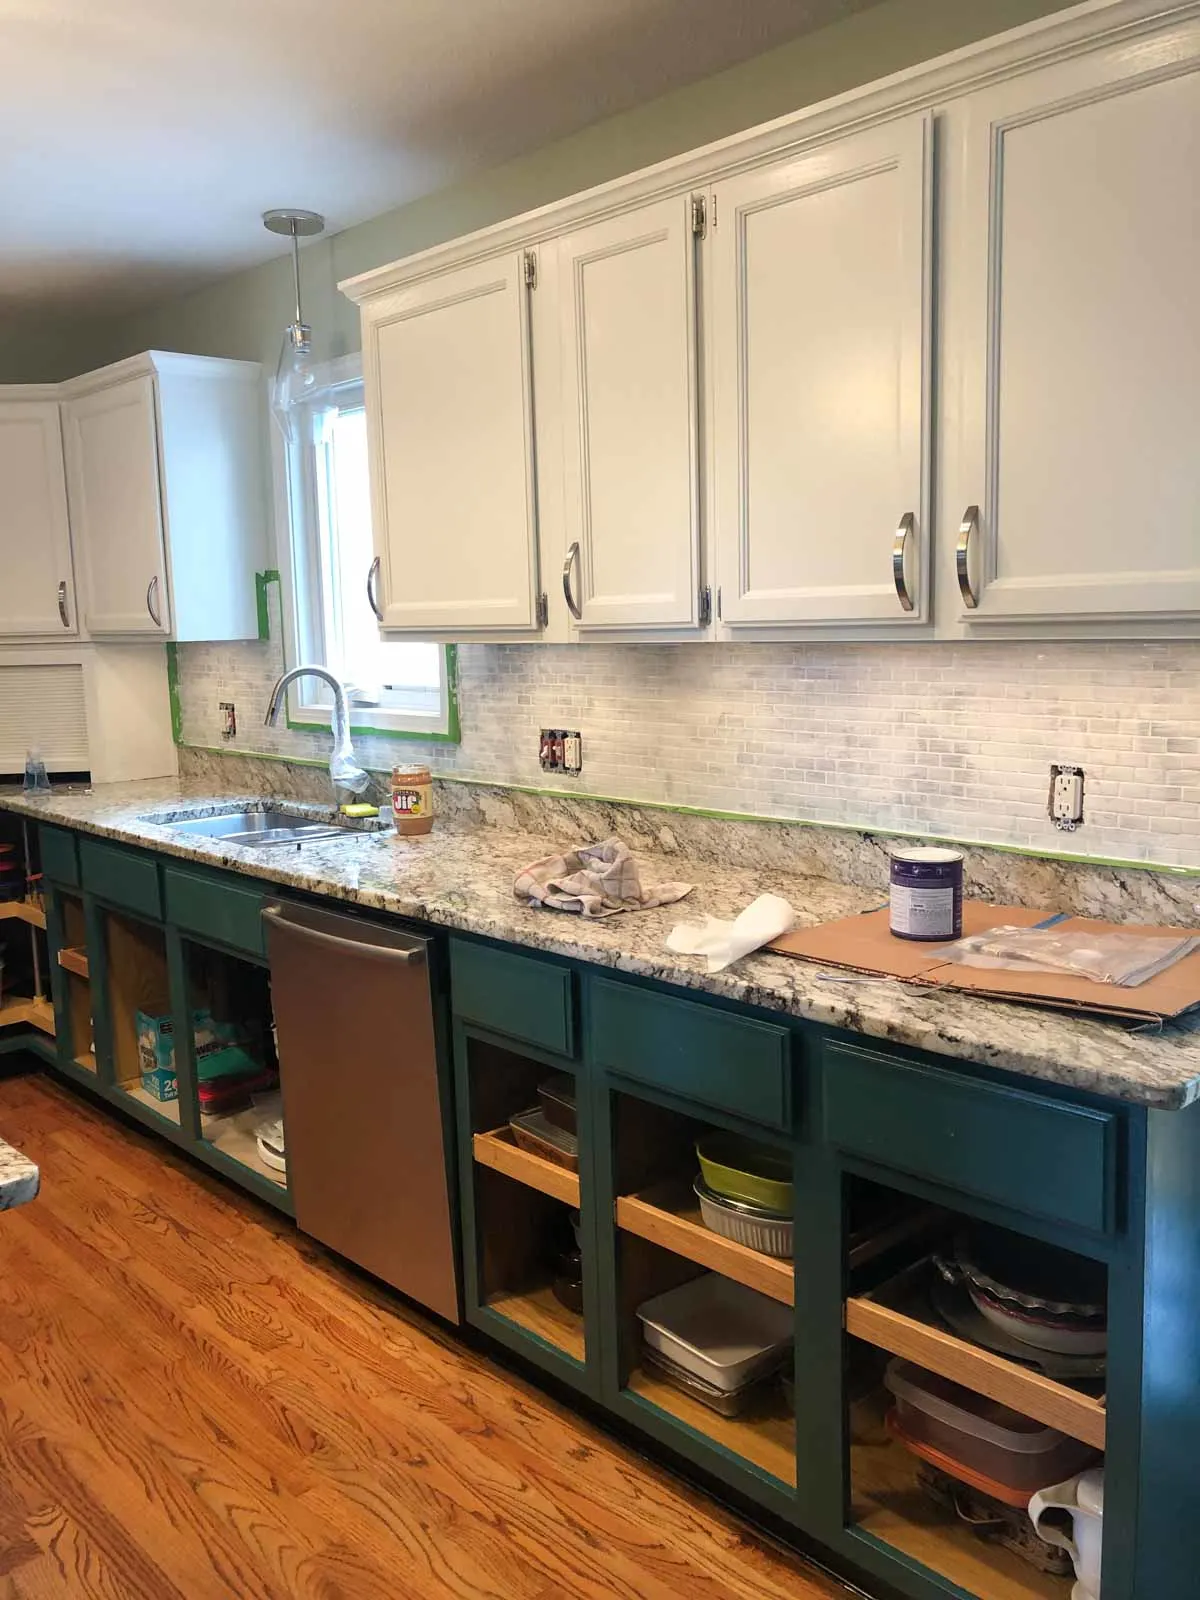
When we first moved into our house we knew that the kitchen needed some updating (you can see what our kitchen cabinets looked like before painting). Over time, we painted and repainted the oak cabinets white and added a glass backsplash and new counters.
However, 8 years later the glass mosaic backsplash was totally dating our kitchen.

Simplified printable instructions are at the bottom of this post.
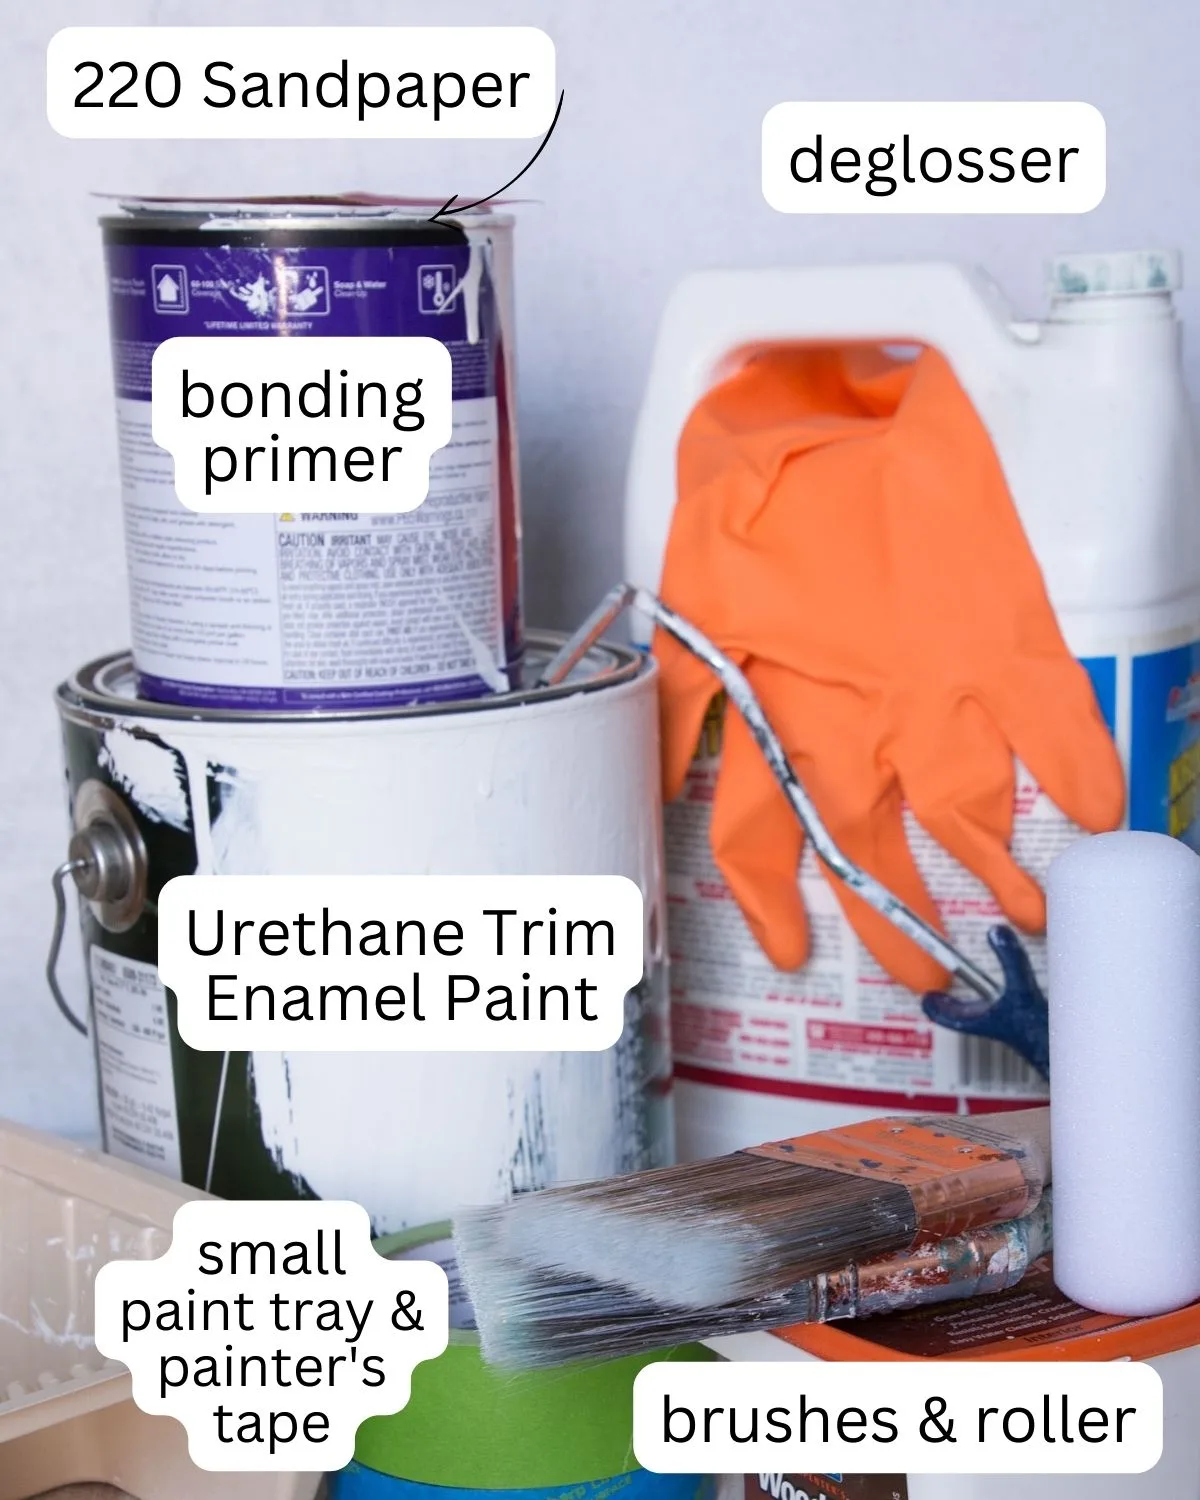
Recommended Supplies
- Deglosser
- 220 Sandpaper
- Dawn Dish soap and green sponge
- Small foam roller and handle
- 2.5 angled brush (Wooster or Purdy are our favorites)
- Small paint trays *We have used these all the time for our painting projects
- Primer or Stix Bonding Primer
- Sherwin Williams Urethane Latex Enamel in the color of your choice -we used High Reflective White
- Painter’s Tape-Only use this type, especially when needing to protect your countertop.
- Cardboard, butcher’s paper, or something to protect your counters
- Paintable caulk (*optional: we haven’t done this yet)

*Note our paint was not tinted and it comes in a color called High Reflective White. If you are trying to decide between colors you may want to check out Samplize where you can get larger peel-and-stick samples of your favorite colors.
Tips For Deciding On The Finish Of Your Paint
Other things to consider are the finish you want your tiles to be.
- Semi-gloss was the perfect choice for us because it gives the tile a little glossy look. We also like semi-gloss for the trim and cabinets as well. I would probably only use semi-gloss or gloss for cleaning reasons.
- By using semi-gloss or gloss paint we have been able to easily clean or wipe our backsplash. And yes, we have had a few bacon splatters!
- You may want to note that a few readers have told us that they wished they went with gloss paint for a little more contrast to their cabinets. It is a personal preference on what look you prefer. The only con to using gloss paint is that it will show imperfections a little more than semi-gloss paint.
Other Considerations
- Some people may suggest using an epoxy kits meant for tile. However, they are smelly, and who really touches a kitchen backsplash compared to other areas in your home? We figured since this isn’t a bathroom floor or something we could try a simpler method.
- If using a kit, you will also have to compare the different white colors. Remembering not all white paints are considered equal. By buying a gallon of the High Reflective White (not tinted) from Sherwin Williams I knew I could use that paint to make everything match if I wanted to in the future.
- You can use Stix primer instead of the one we used. This is actually the one we recommend, but were not able to get it in time.
Painting Backsplash Tile
See the video in this post as well.
Step 1: Clean Tiles
Clean the tiles with dawn dish soap and a sponge. You want to make sure that you are cutting the grease and grim.
Really make sure you have cleaned while around your stove as that is where it tends to be a little dirty and greasier (hello bacon at our house).


Step 2: Let Dry
Wipe dry.
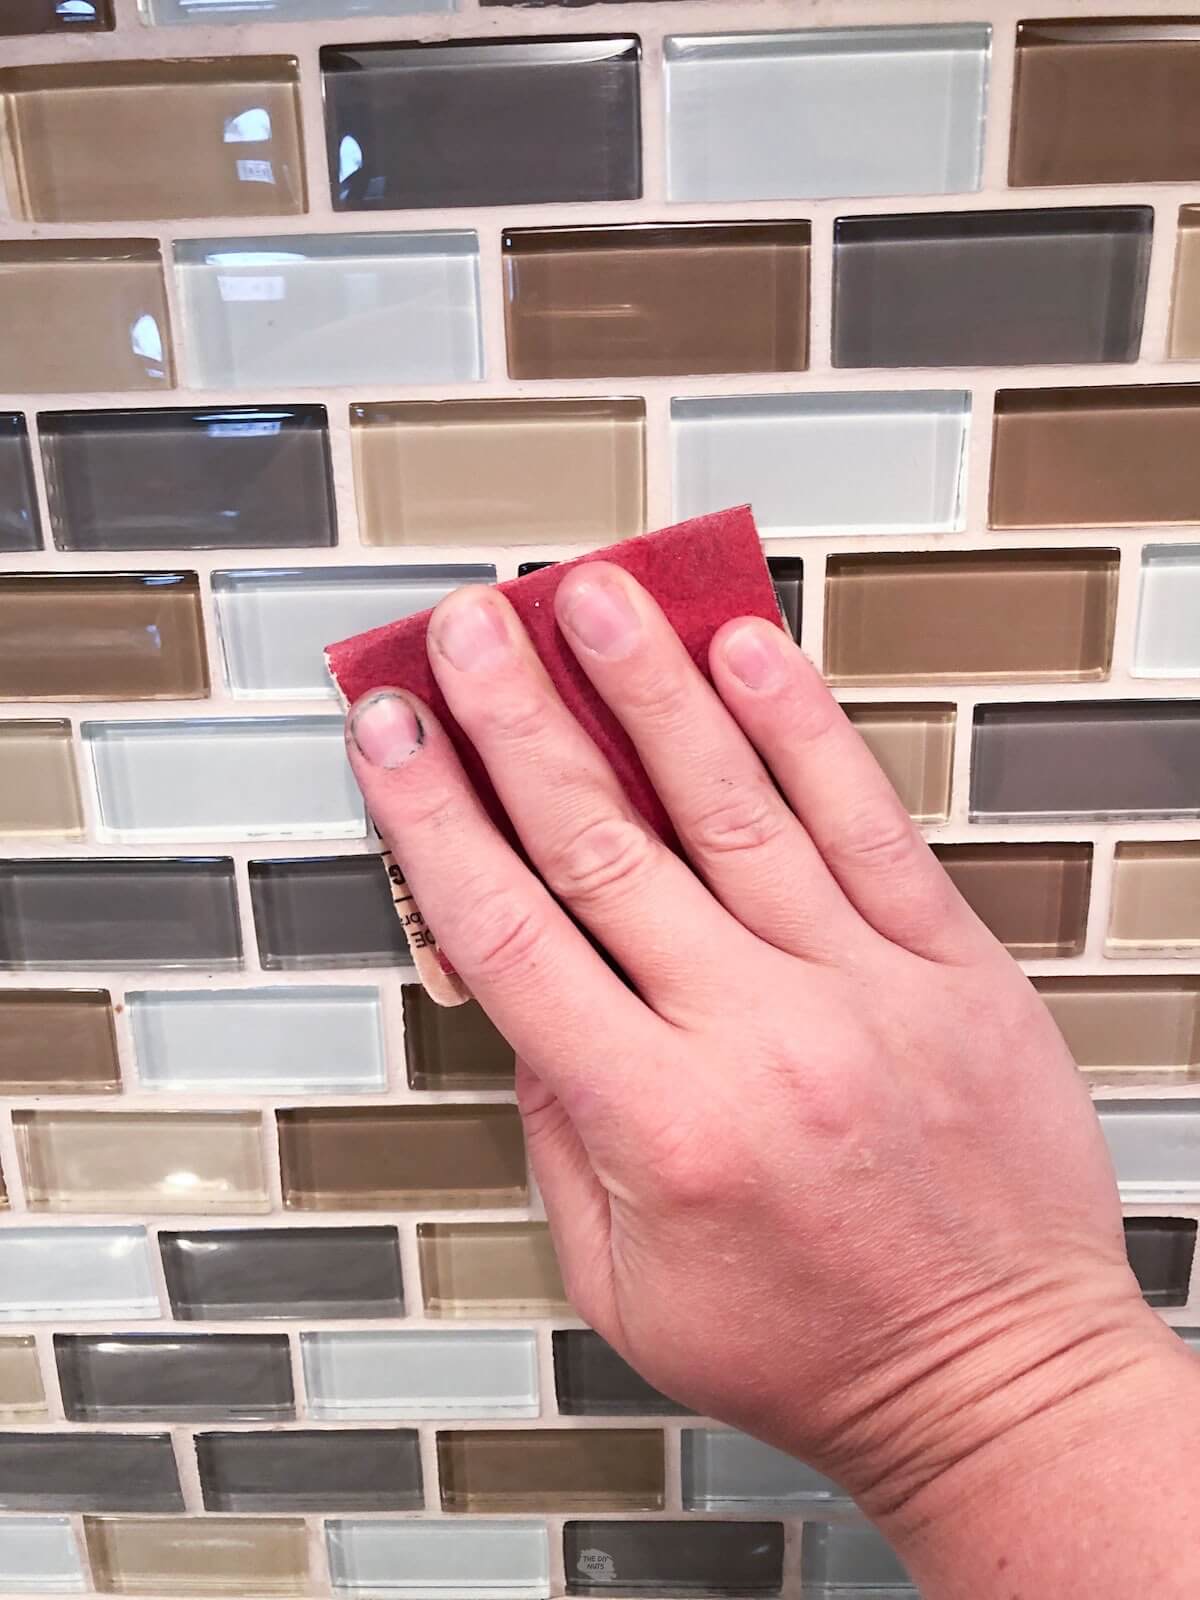
Step 3: Lightly Scuff Surface
Use extra-fine sandpaper to scuff up the tile. I did not do a ton of this, just enough.

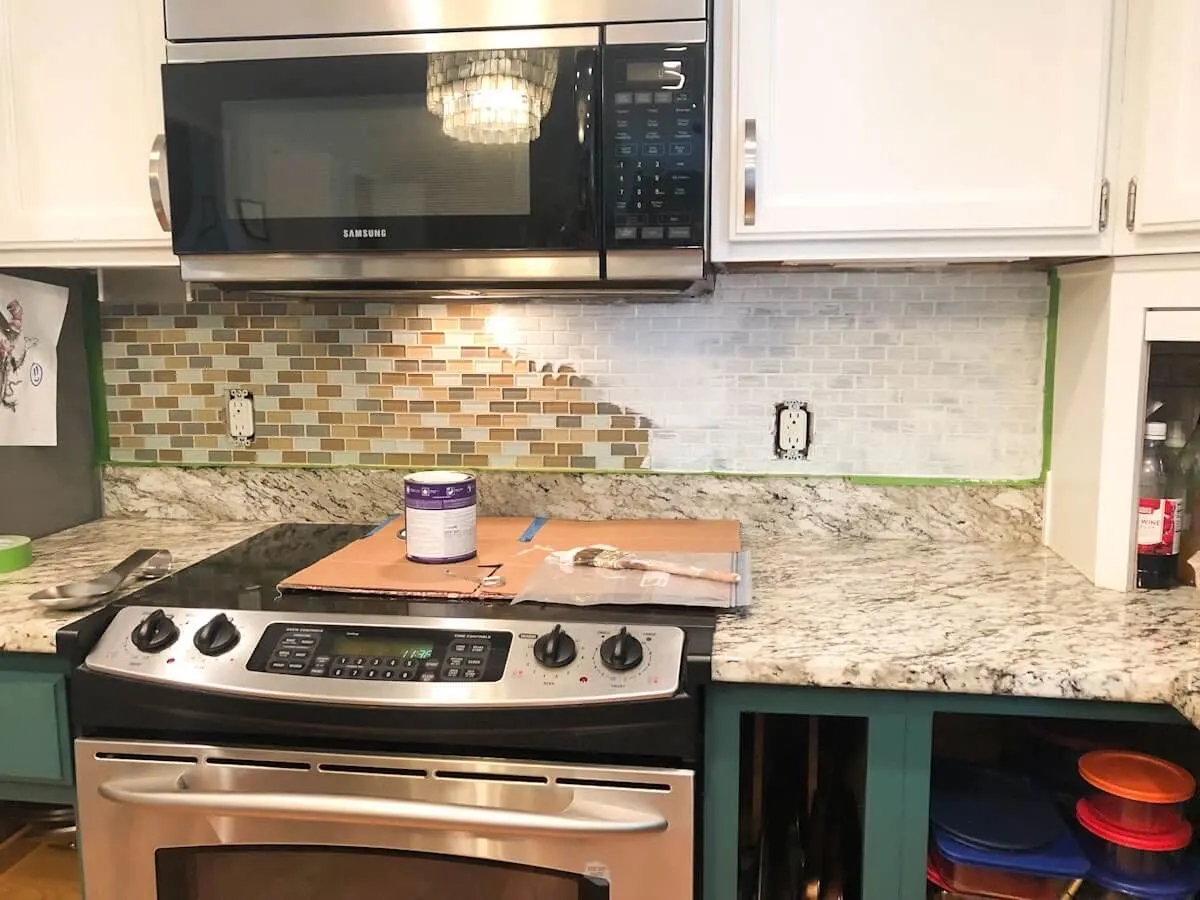
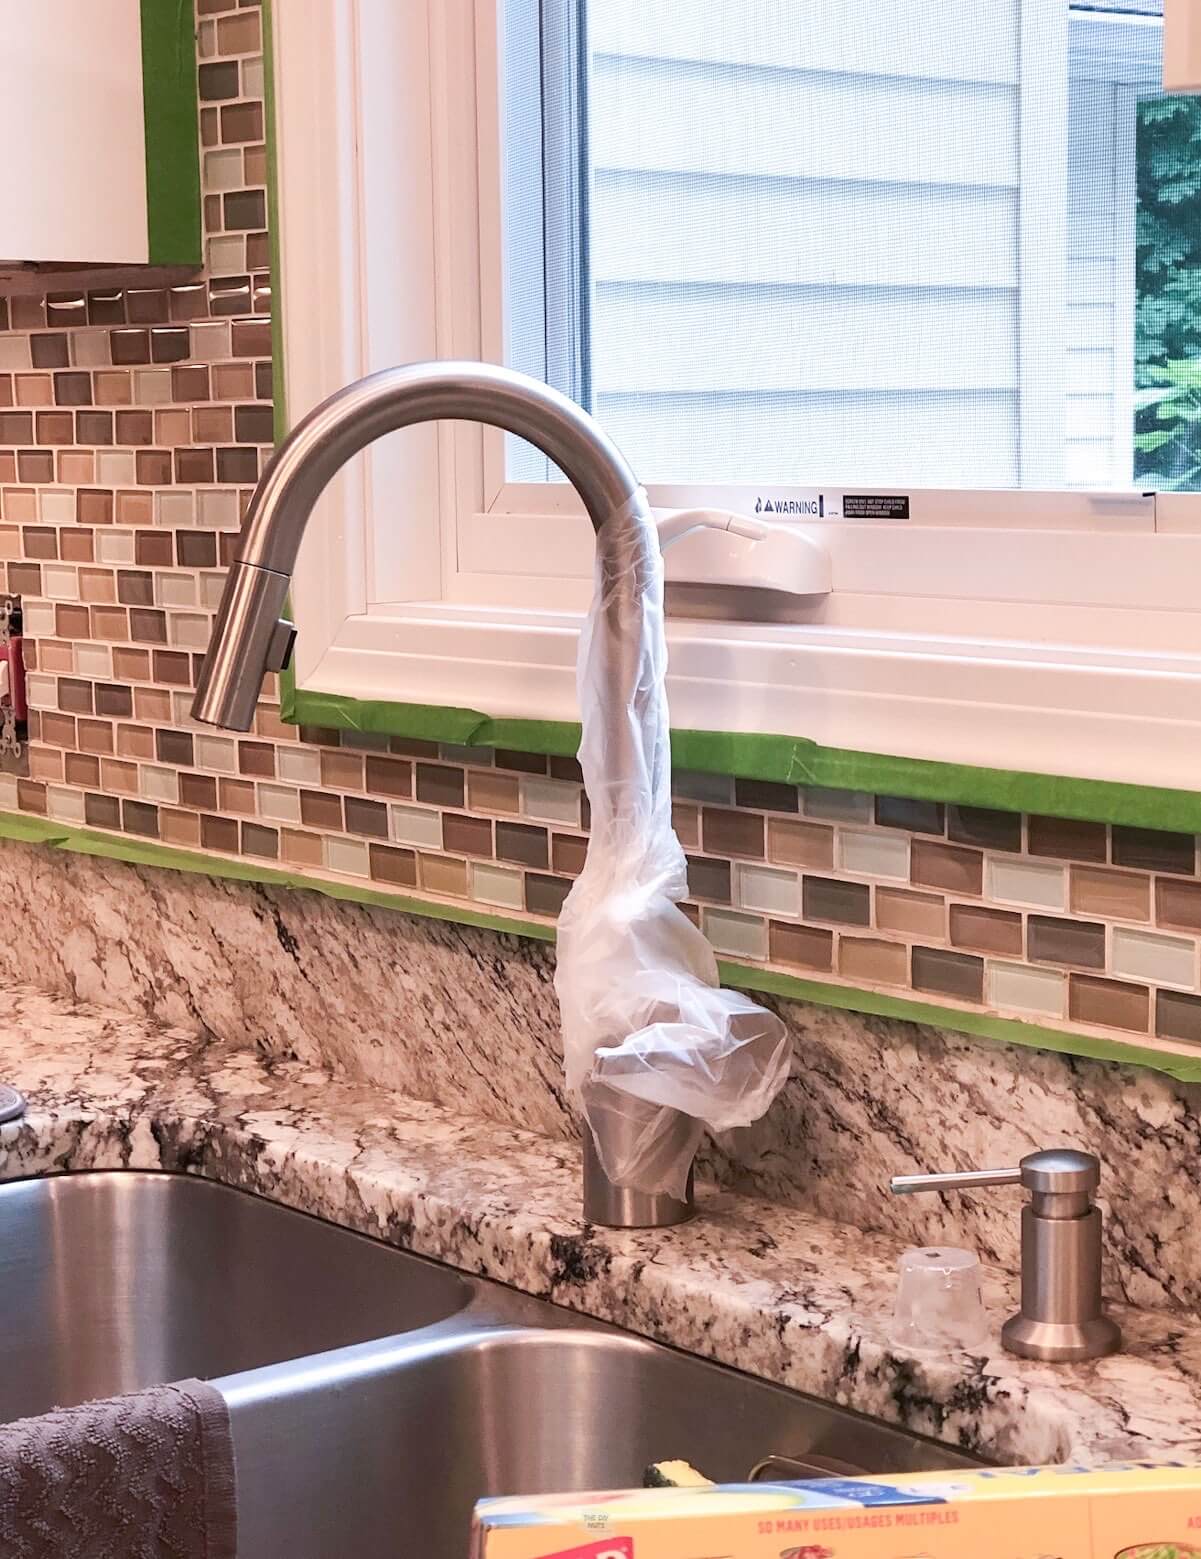
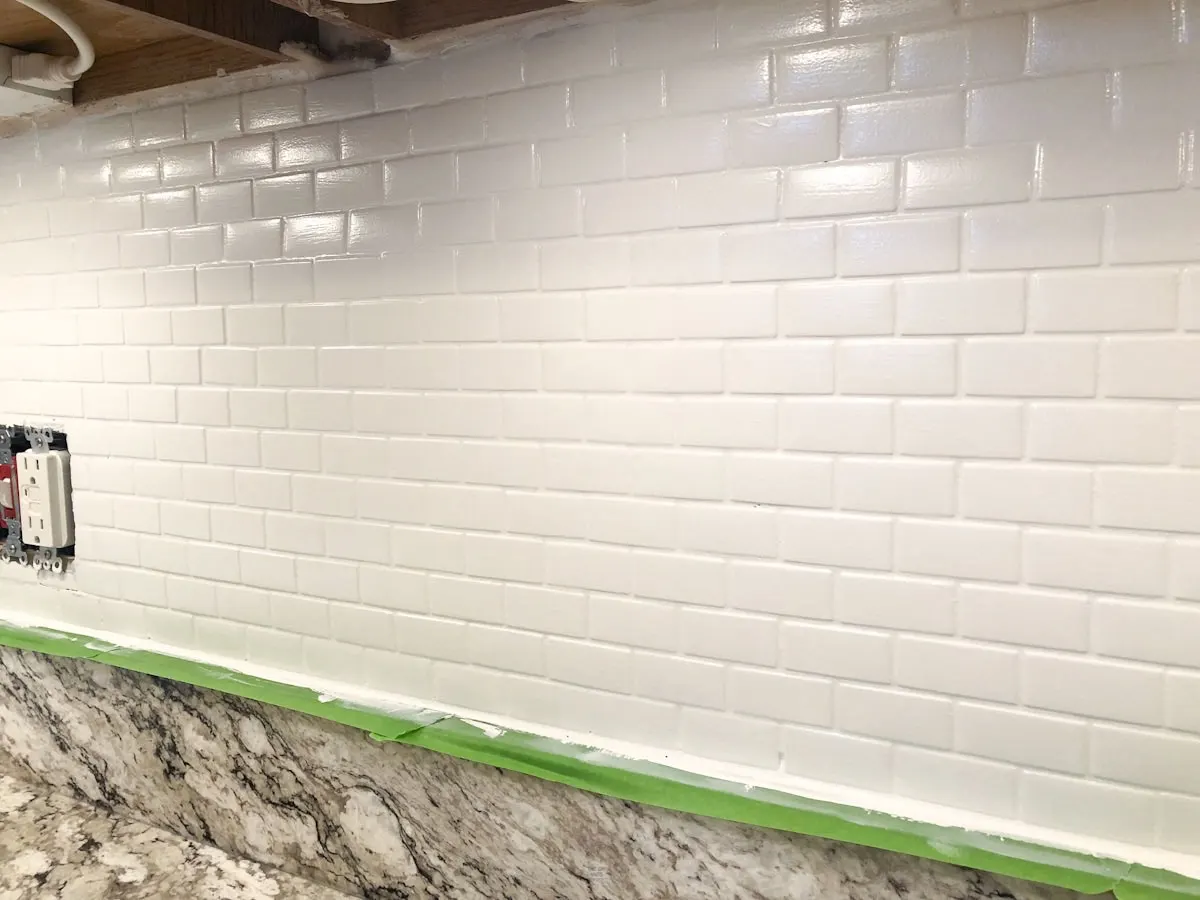
Step 4: Prep Areas With Painter’s Tape
Wipe areas you don’t want to be painted like the counters and window frames. Add painter’s tape to the areas. Press your fingernail in the seam between the counters and the tile. You may need to caulk this area after you paint.
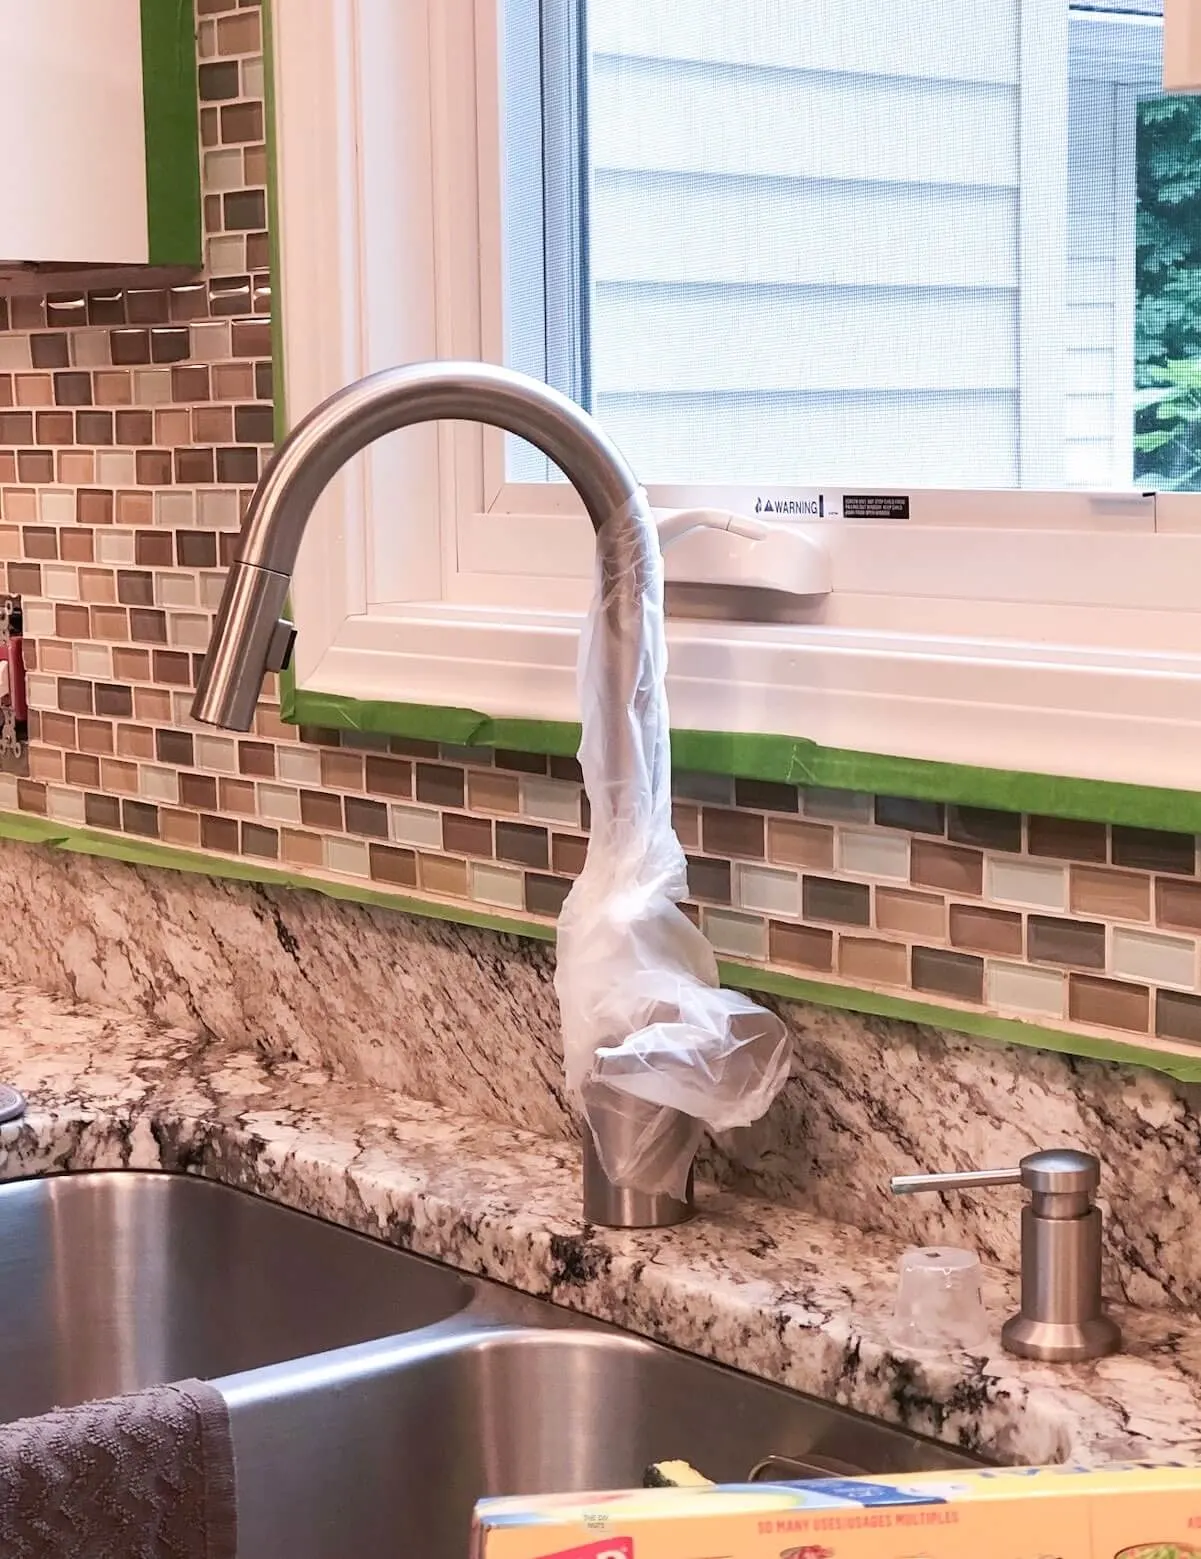
DIY PAINT TIP
Use Press N’ Seal Wrap to help protect things you don’t want to be painted. We did this painting of our oak railing using two different colors.
It was great for the faucet in this case. If you wrap it loose enough, you will still be able to use the faucet as well!

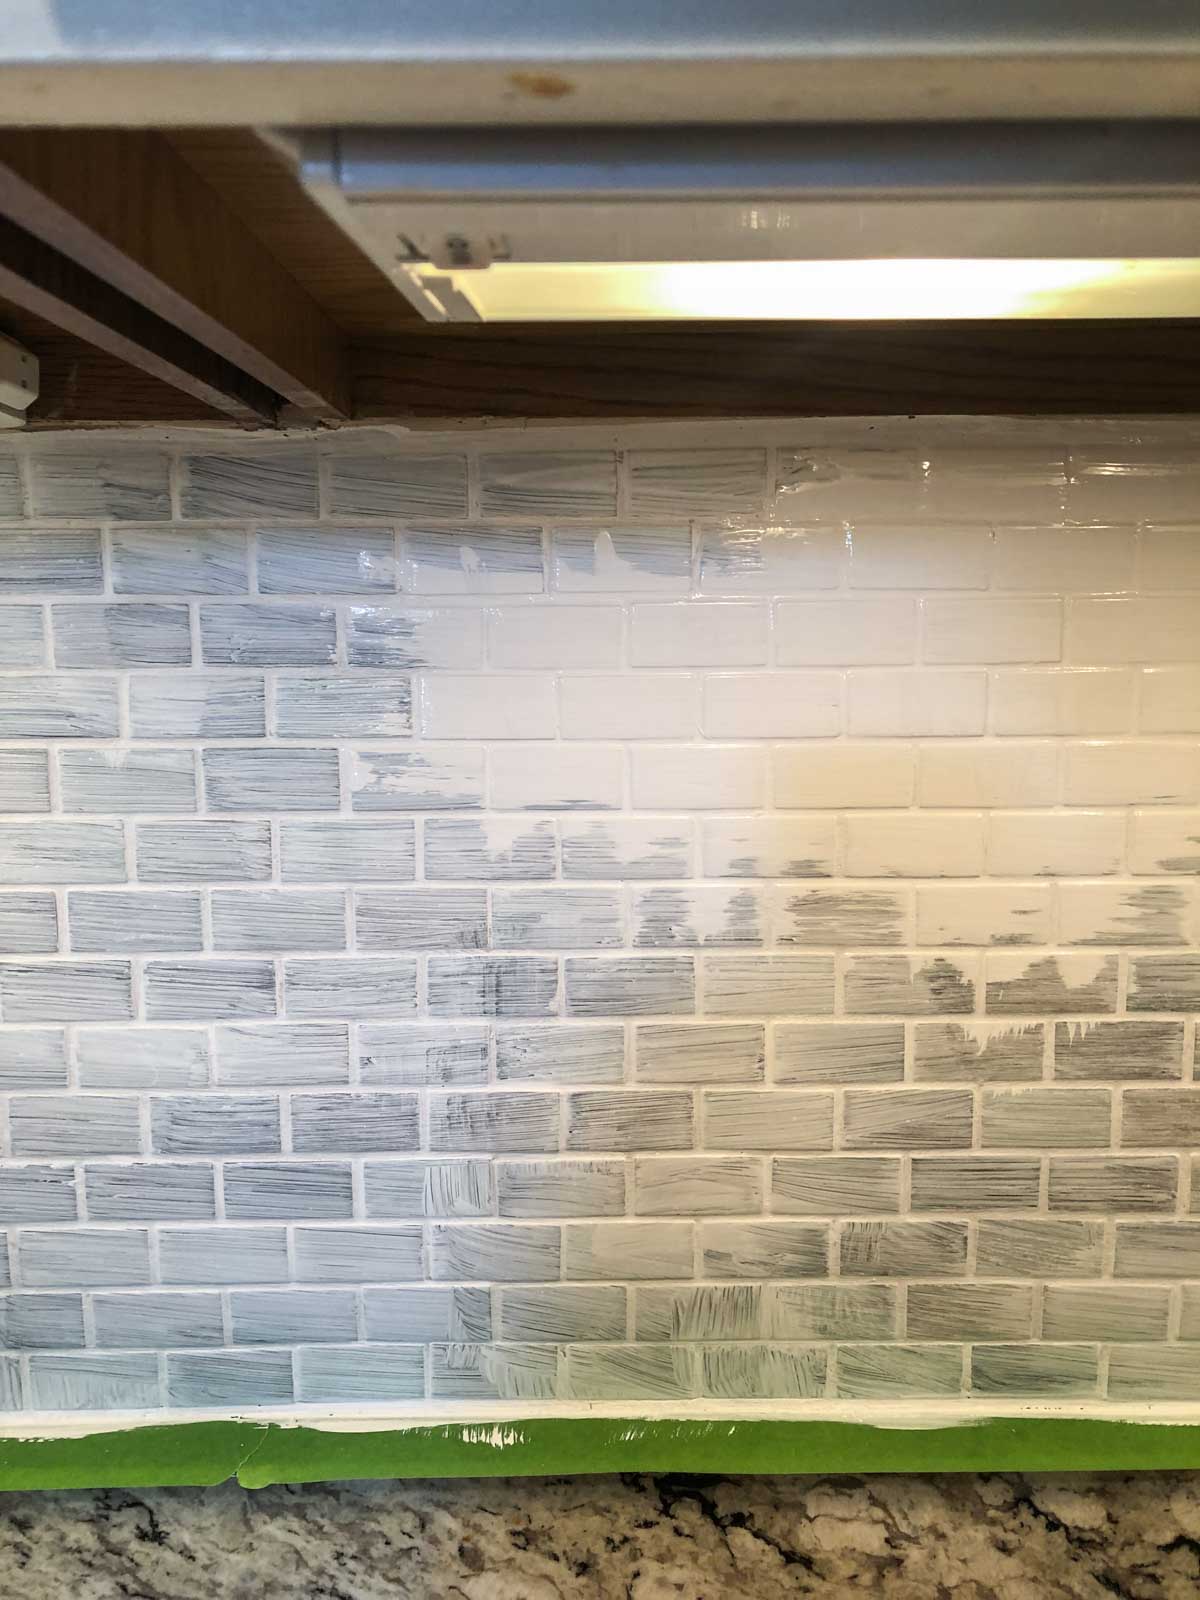
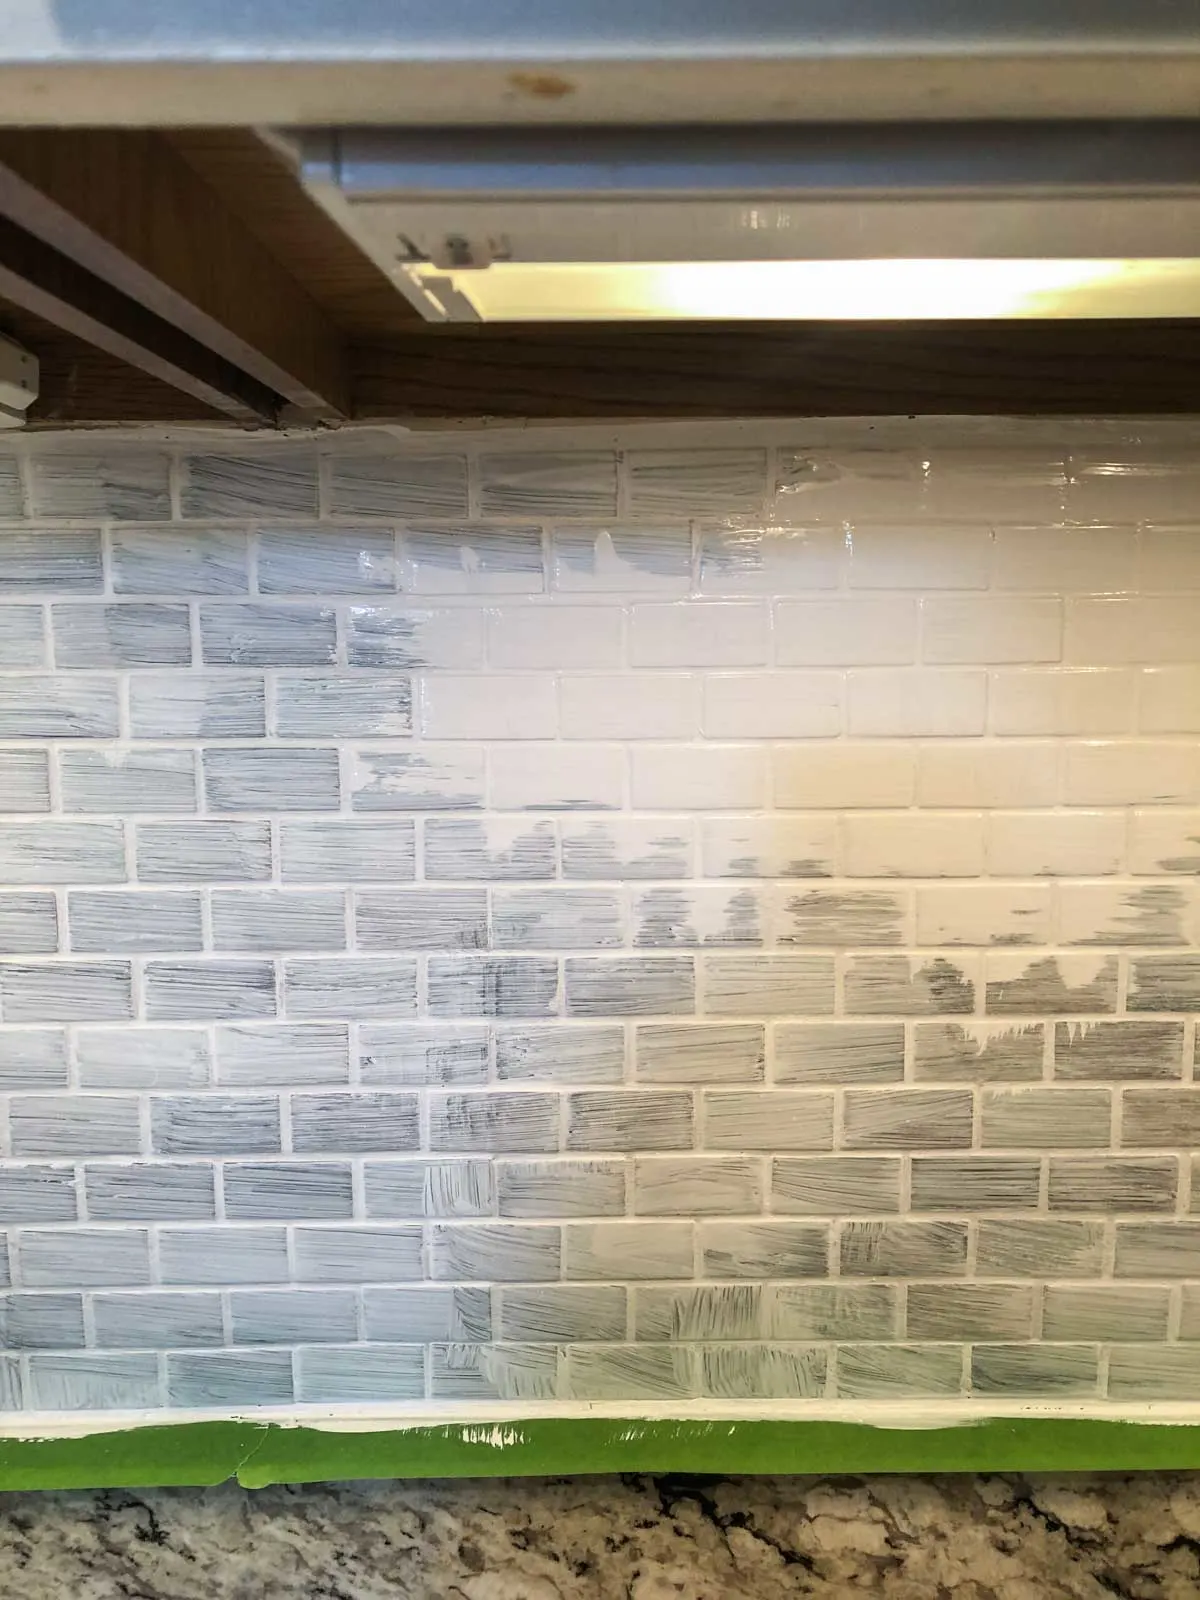
Step 6: Apply Primer
Use a brush with the primer to cover all the grout. Work in small areas.
If your tile is larger you may use a roller after the brush in the grout lines. Since our glass tile is so small, I only used a brush for the primer. This might have left a slight texture, but I liked that idea instead of completely flat-looking tiles.

You can see how we used the same primer and paint to paint a laminate bathroom countertop. We love it when we can use the same supplies for different DIY painting projects.
Step 7: Check For Drips
Make sure that you are lightly brushing away drips. This is probably the trickiest part of the painting. If you do end up with a few bumps, you can always sand them before the next coat.

Step 8: Let Primer Dry
Read the instructions on the primer you chose. This primer was dry to the touch within 30 minutes to 1 hour. It really was, so this helped with the overall length of time this project took.
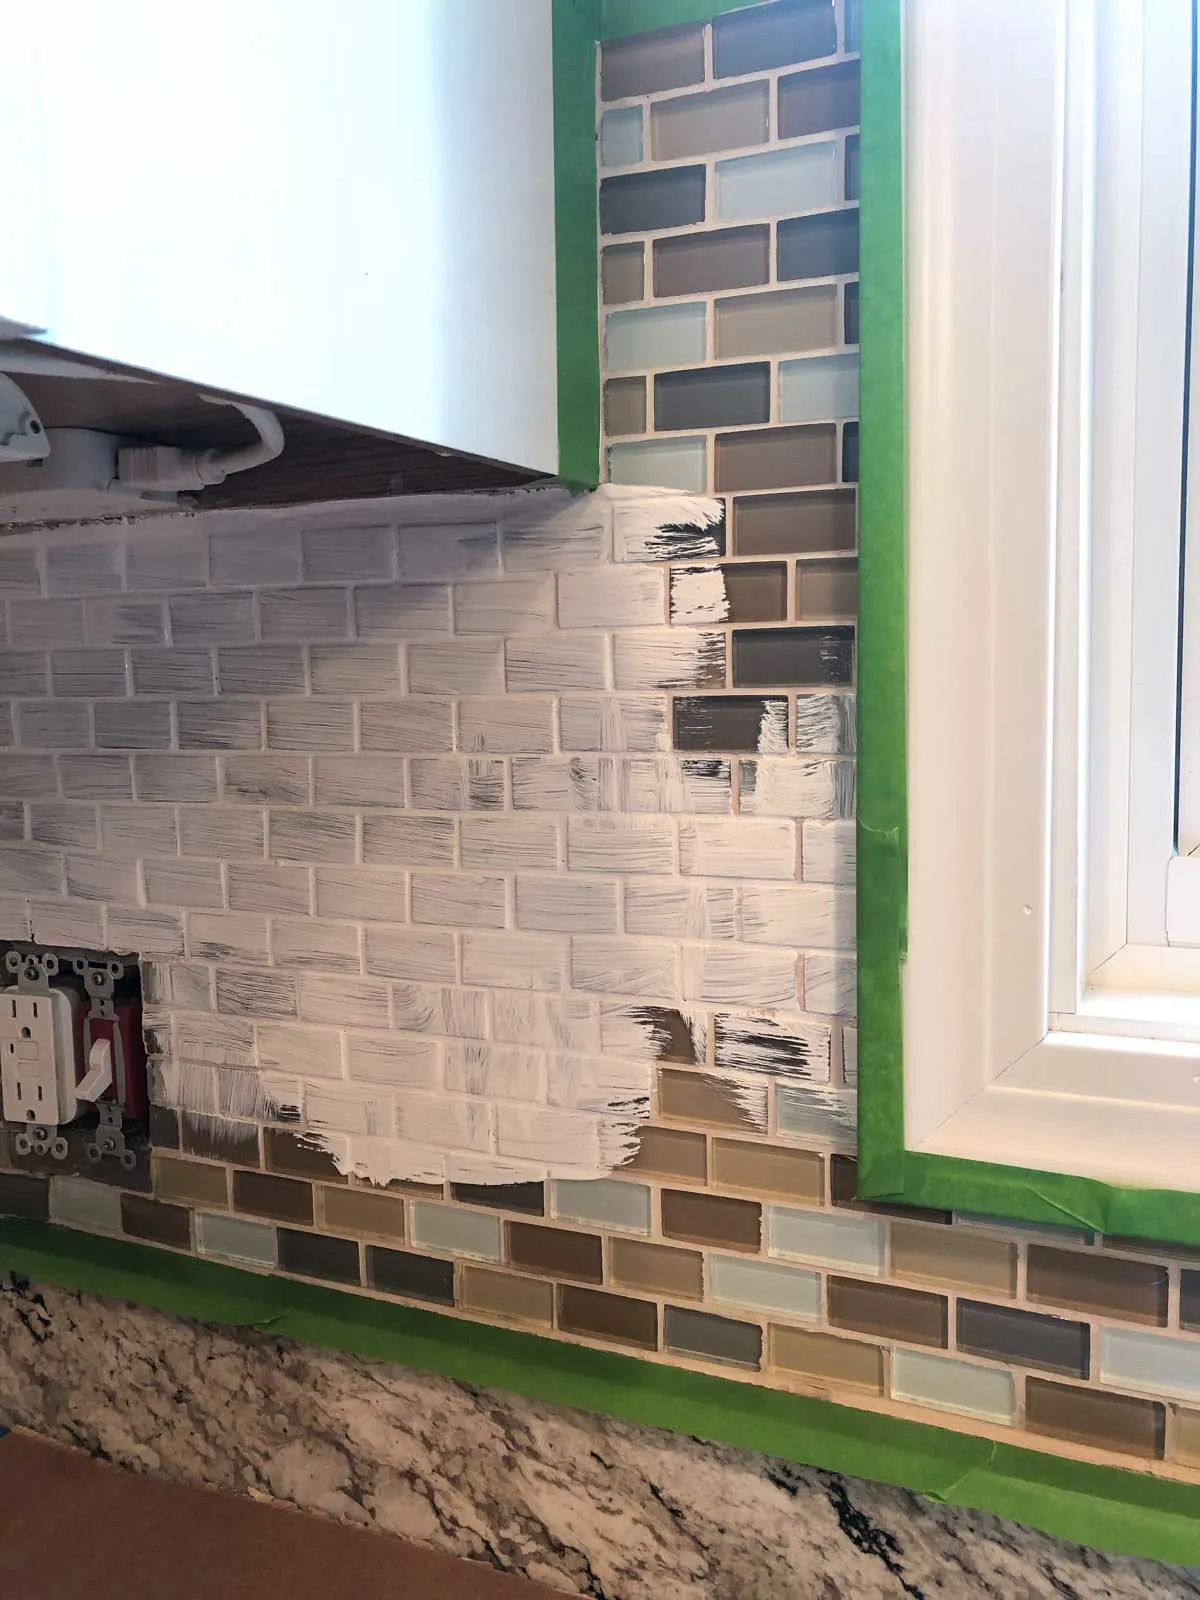
Does the primer have to look nice?
Don’t let the splotchy priming job worry you. The most important part about priming anything is that you have completely covered the surface you are painting. You can see how the white color is much more solid once you start using paint.
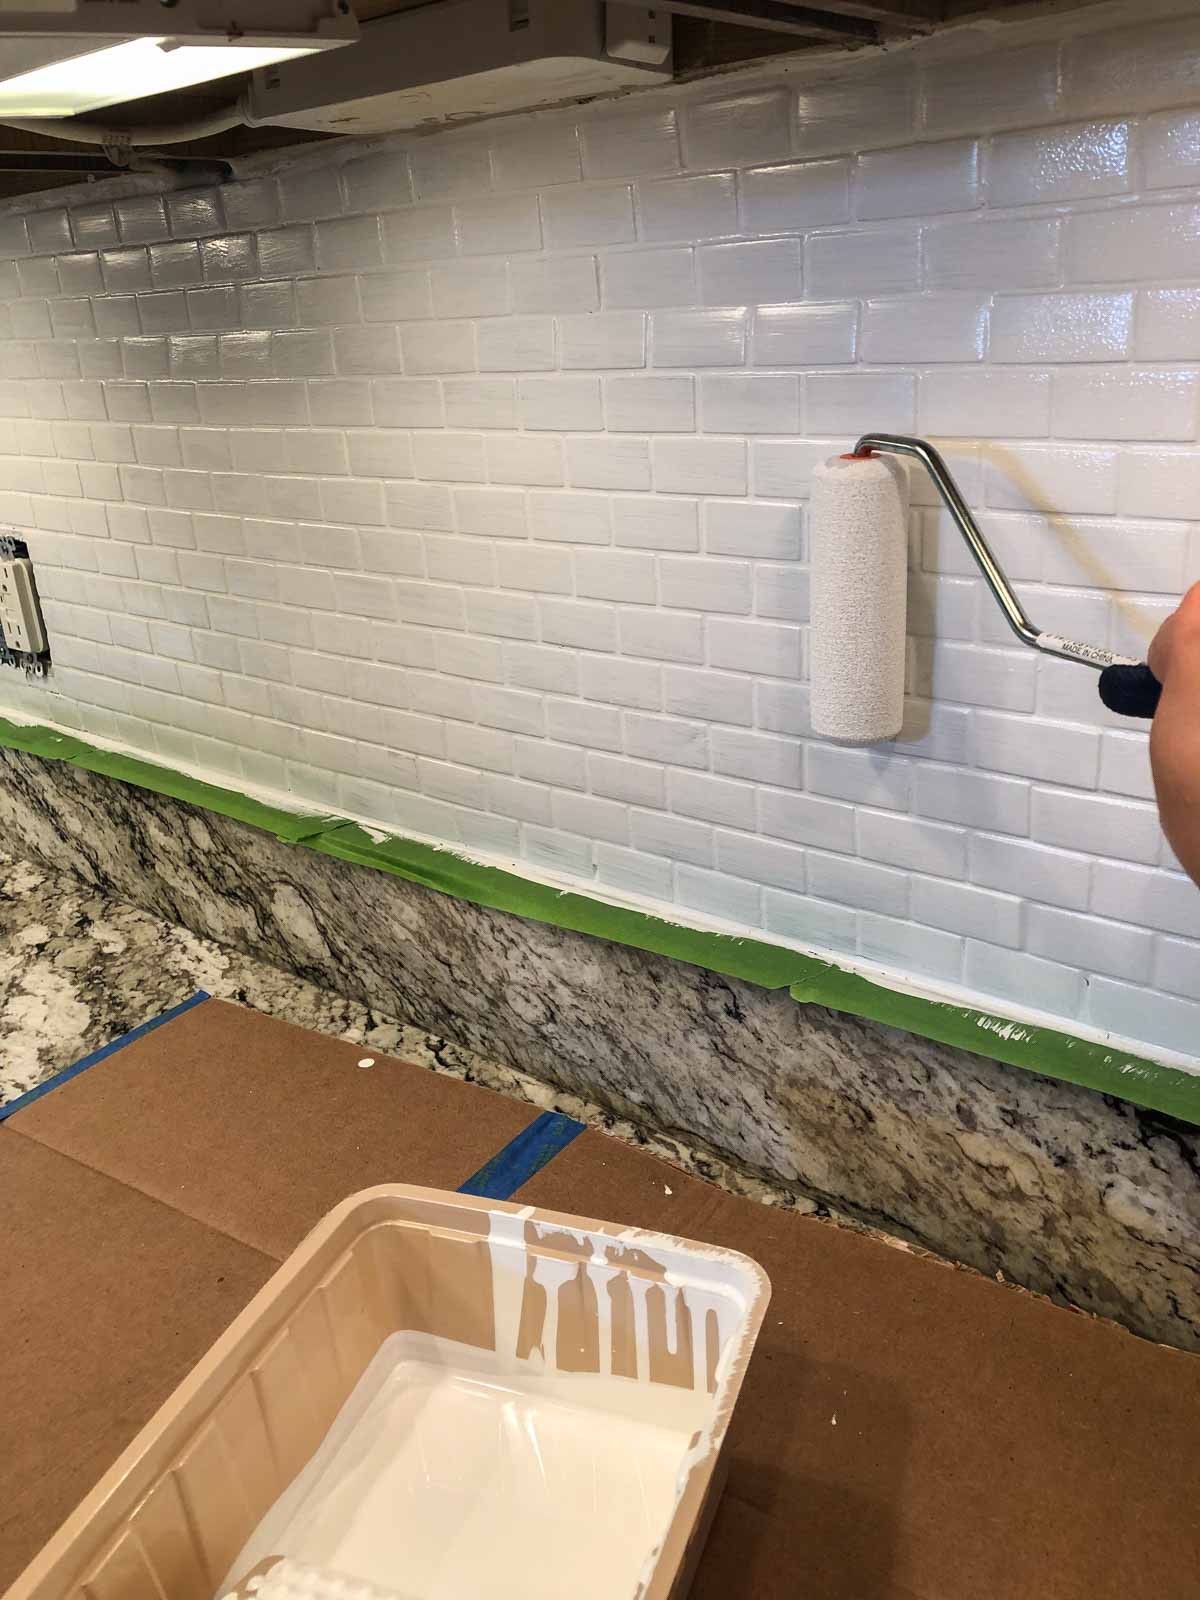
Step 9: Start Painting
Once the primer is dry, you can repeat the brush painting with your paint. We used Sherwin Williams Urethane Enamel in High Reflective White.
Use Brush and Small Foam Roller
After the first coat of paint with the brush, the next two were done mainly using the small foam roller. This allows for more even coverage. Just make sure that your grout is completely painted to your liking as working.

Step 10: Allow Each Layer Of Paint To Dry
Allow proper dry time between each coat of paint.

You may need 2-3 coats of paint depending on how dark your tiles were to begin with. You may need to lightly sand with 220 paper any imperfections. We used 3 coats of paint.

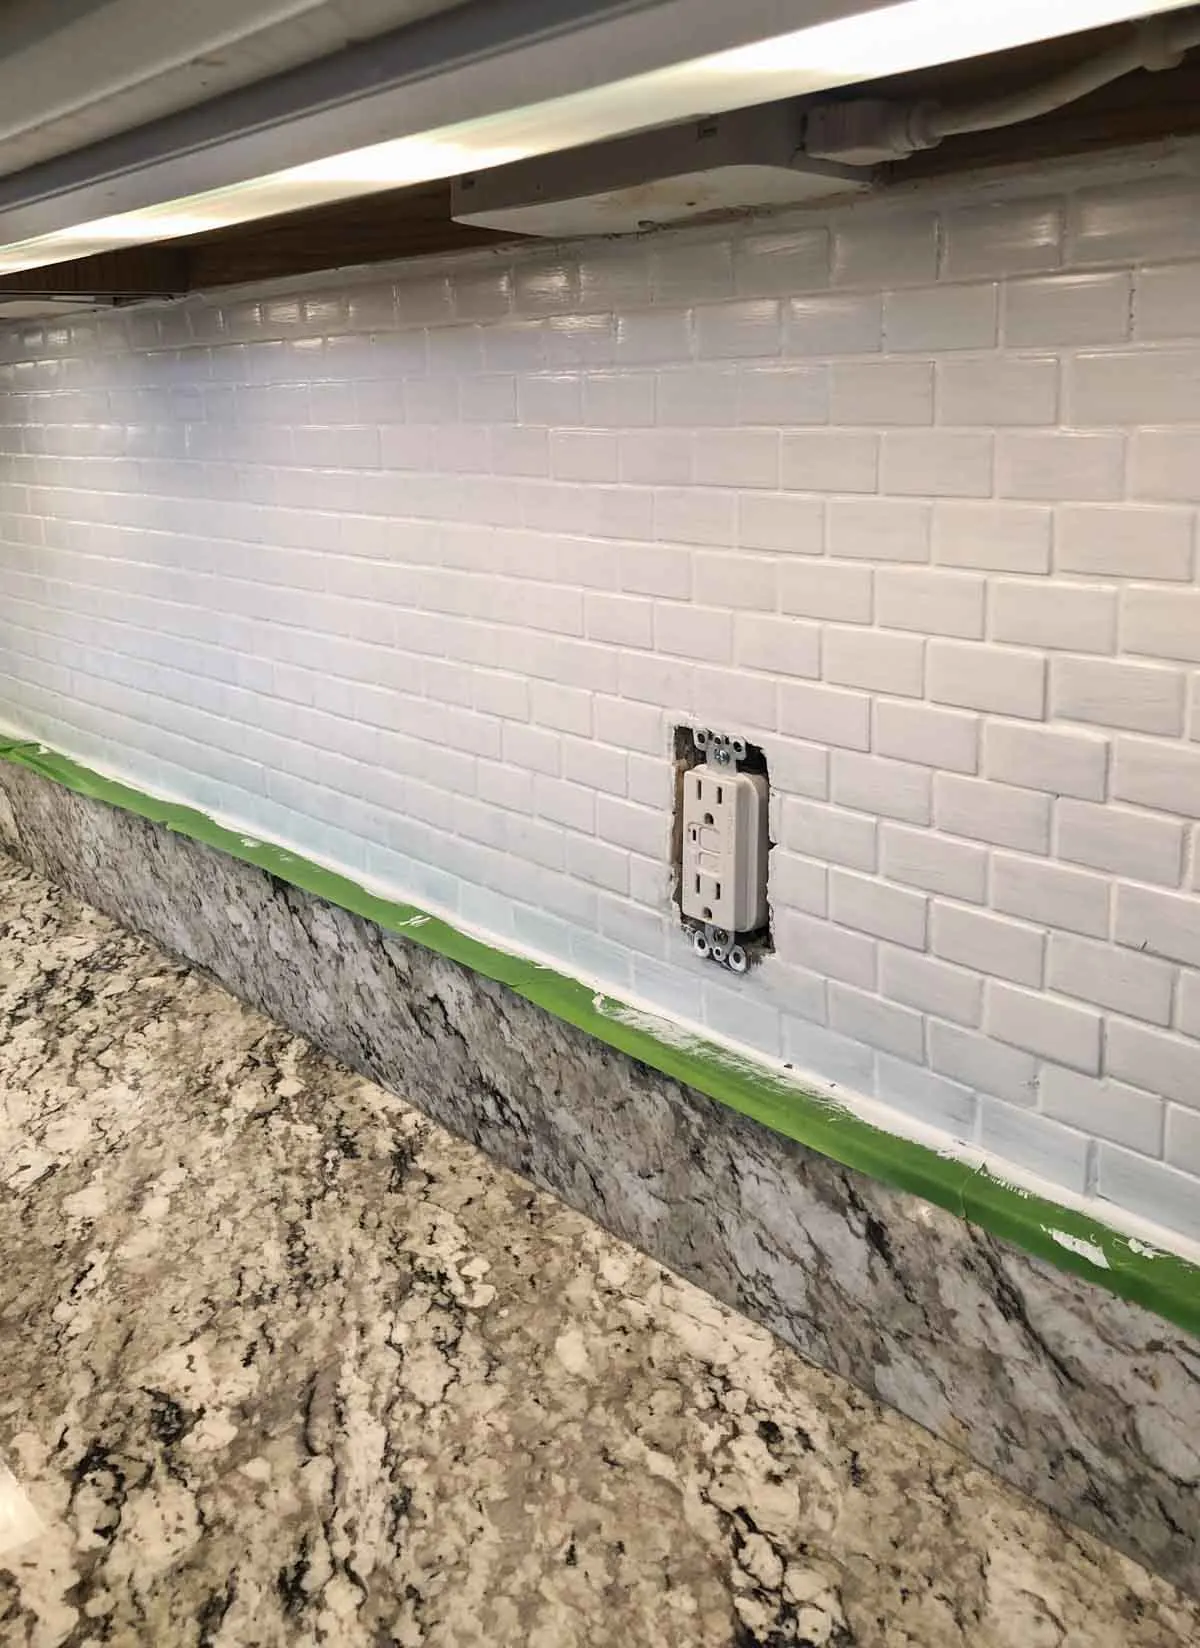
Step 11: Remove The Tape
Remove painter’s tape and caulk any areas for a clean look.
Expert Tips
- The most time-consuming part of this DIY is the prep and allowing for proper dry time. Each layer of primer or paint was done in 30-40 minutes.
- Some DIY painters recommended using an electric sander and a cleaner called TSP. My tiles were not that greasy so I thought my prep process was the simplest and easiest.
- By using a brush to cover all the grout lines before the small foam roller you will ensure a smooth finish. You will get a clean look by using the same color on the tiles and grout lines.
- After painting our kitchen island with Sherwin Williams Urethane Trim Enamel, I knew this was the paint I wanted to use. You will not be disappointed in this self-leveling paint.
How-To FAQs
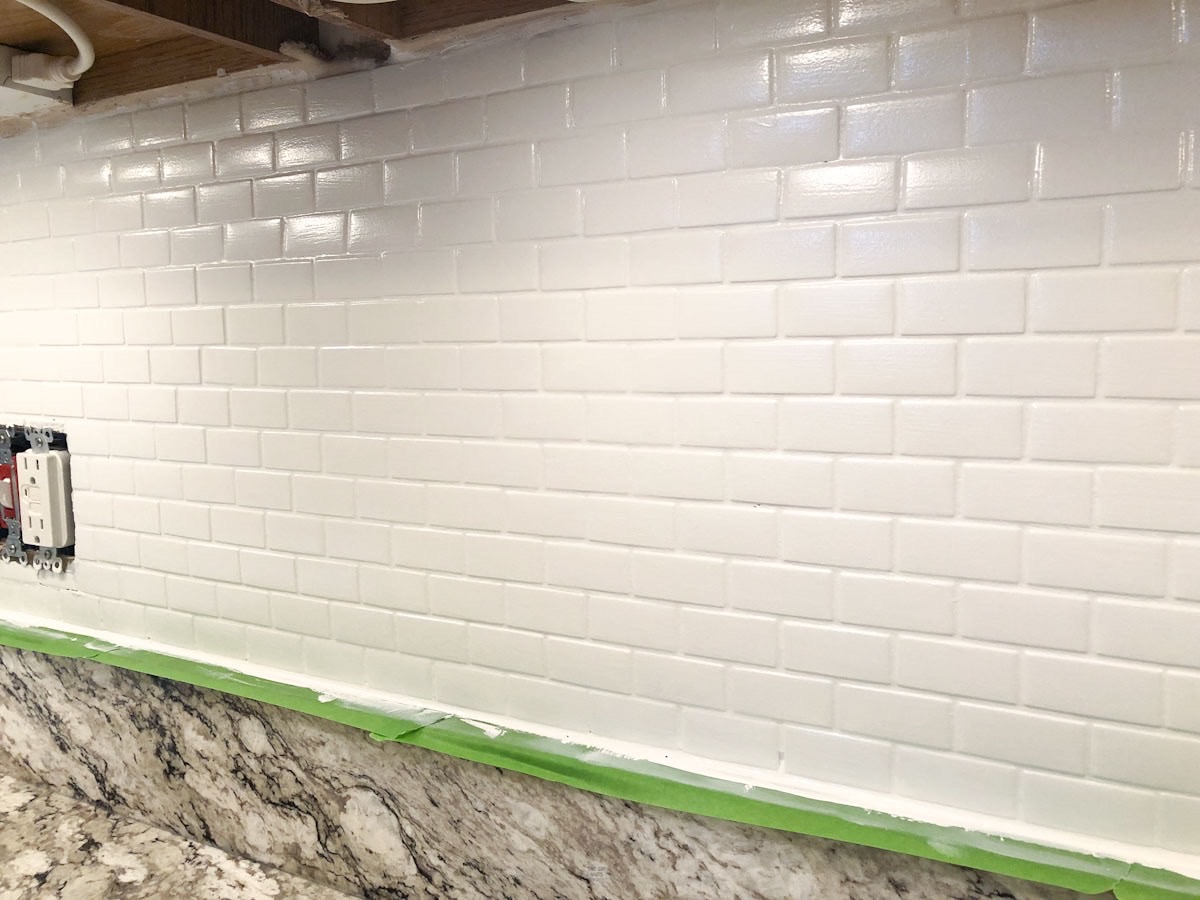
Painting your tile backsplash is a great way to modernize your kitchen. Compared to other tiles, your backsplash really doesn’t get touched and beat up. You also can have a modern look without going through the hassle of completely tearing out the tile.
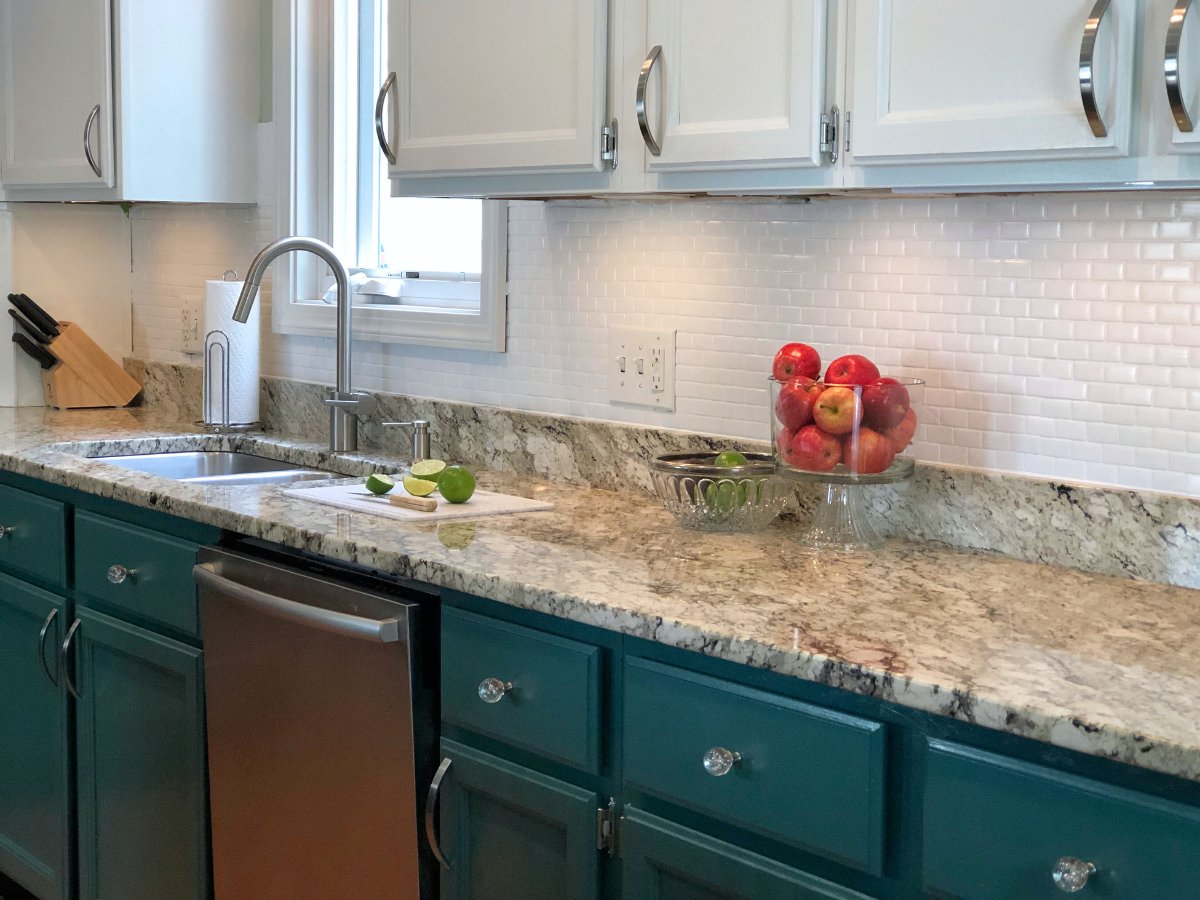
It has been over a year and our painted tile backsplash looks the same as it did when we finished it. Because we used semi-gloss paint, you can easily wipe and clean any messes that splatter on the tile.
You can follow the same steps we used to paint our glass tile backsplash. The most important part is the prep, cleaning and priming. We always recommend testing the primer first to make sure that it does not scrape off with your fingernail once dry. If it sticks, you should be able to easily paint your tile.
If your grout lines get covered by rolling, you can get away with mainly using one and then just trimming hard-to-reach areas with a brush.
Yes, you can paint your kitchen backsplash any color to fit your style. The paint we recommend using can be tinted to match your decor. You can even use this method to add a stencil design to create a patterned look.
White paint can give the tile a more cohesive subway tile feel. If choosing a white paint, make sure to compare white paint color samples to your upper cabinets, moldings, and other doors in close proximity
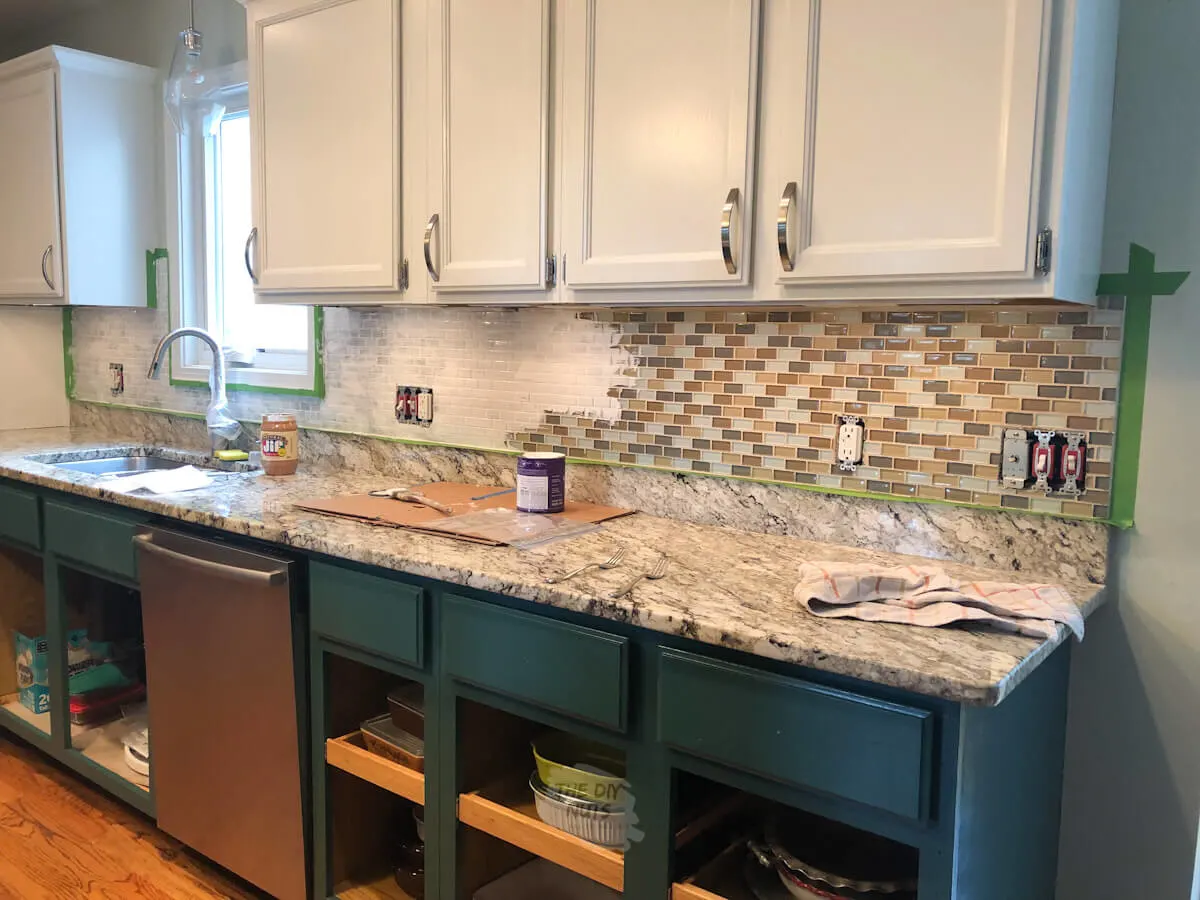
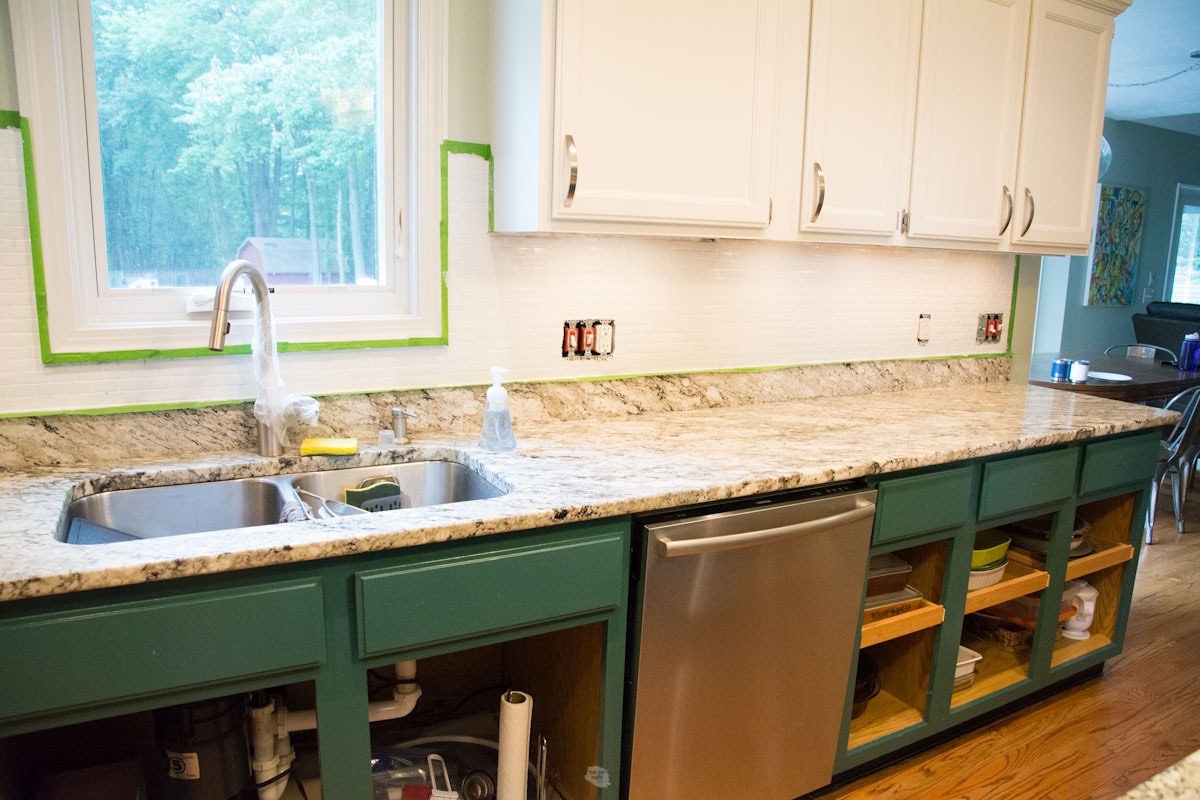
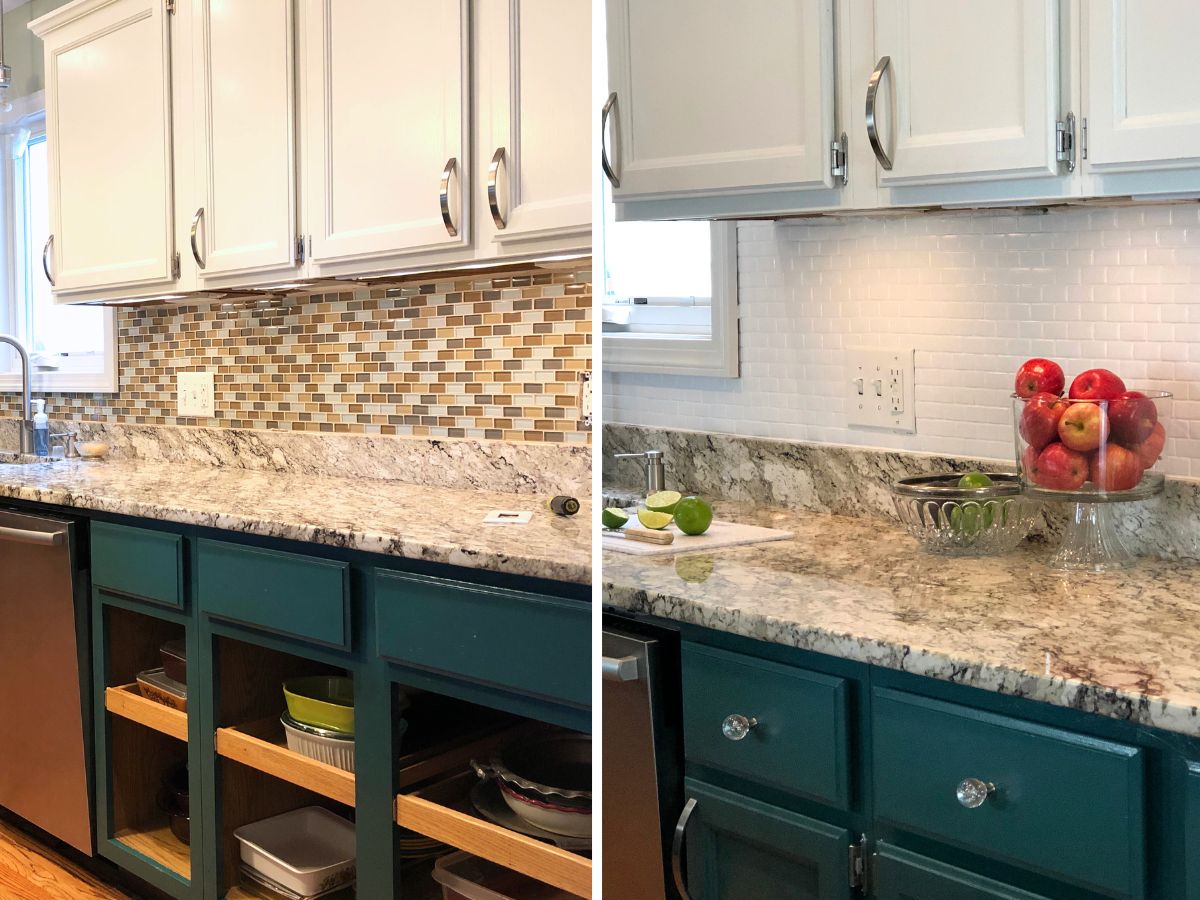
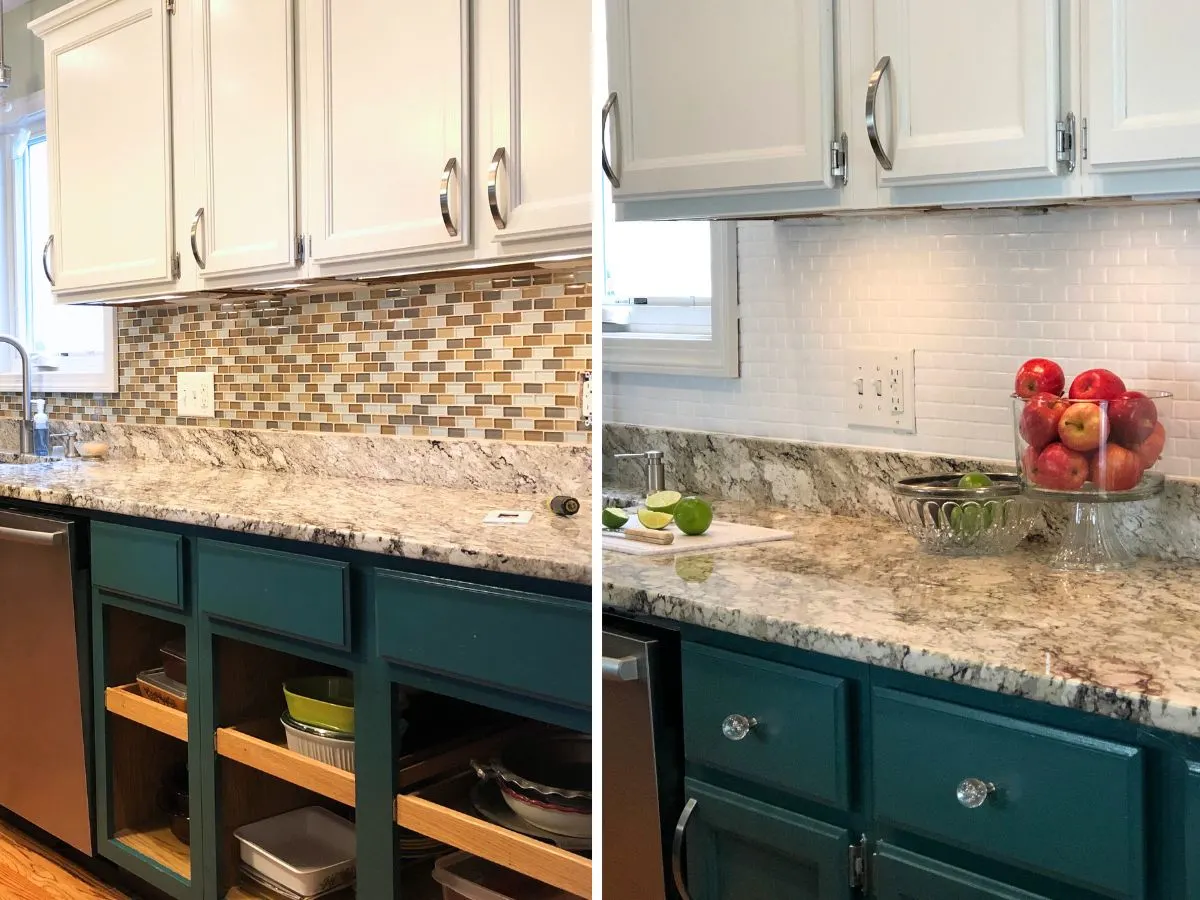
Before and After Painted Backsplash Tile
Yes, I know the angle is a little different and this is what our cabinets looked like before I also started painting the lower cabinets. But you can totally get the idea of the amazing budget-friendly kitchen makeover using ONLY paint!
Follow us on Pinterest, Youtube or Facebook for more DIY inspiration!
More DIY Painting Project Ideas
- How To Easily Paint Bathroom Cabinets
- 7 Mistakes To Avoid When Painting Cabinets
- How To Whitewash Brick: get the scoop on all the supplies we used to upgrade a brick wall fireplace.
We absolutely can’t get over how much our painted tile backsplash has modernized our kitchen. If just hate the look of your backsplash and don’t want the hassle of tearing old the old tile, you really should consider this DIY painting project idea.


If you like this tutorial, make sure to give it 5 stars below 🤩🤩🤩🤩🤩. It truly helps us continue bringing you more free and budget-friendly DIYs.

Painting A Tile Backsplash
Equipment
- 2.5″ Angled Brush
- Painter’s Tape
Recommended Supplies
Instructions
- Clean tile with dawn dish soap.
- Wipe dry.
- Use extra-fine sandpaper to scuff up the tile.
- Wipe away dust.
- Tape out areas you don’t want painted and cover counters with cardboard, drop cloth, or butcher paper.
- Optional: Use Press and Seal to protect the faucet handle.
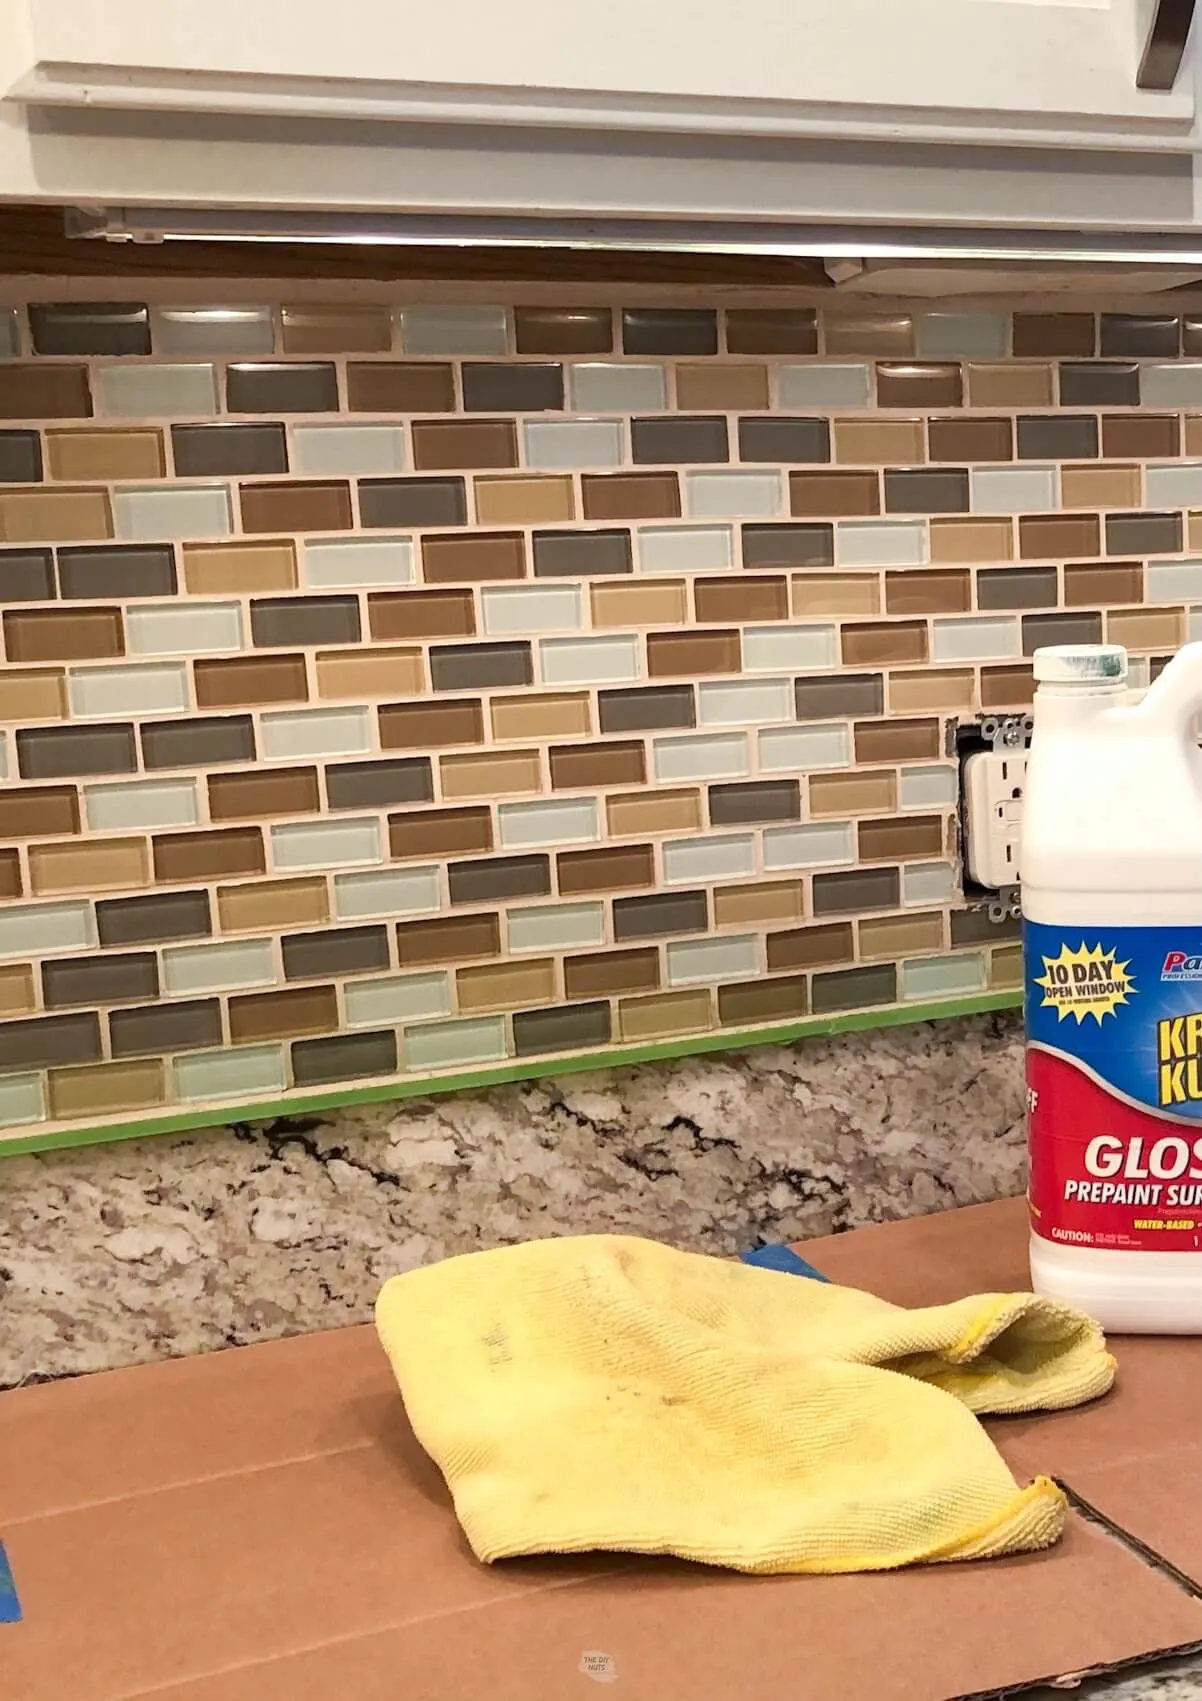
- Wipe down tiles with deglosser.
- Use a paintbrush to paint grout lines and a small foam roller with primer. Make sure to wipe away any drips that are occurring when painting before it dries.
- Let dry (read instructions on paint cans for your dry time).
- Repeat with Urethane Trim Enamel paint in the color of your choice.
- Paint at least 2 coats with proper dry time in between.
- Remove painter's tape and clean up any areas.
Notes
- Test that your primer adhered to your tile by painting a small area and letting it dry. Use your fingernail to make sure you cannot scratch away the primer.
- Semi-gloss or high gloss paints will mimic the look of real tiles.
- Continue to check for drips as you are working. You can always sand with extra fine sandpaper in between layers if needed.
Jamie
Monday 11th of September 2023
I just painted my glass backsplash with Benjamin Moore Regal Select semi-gloss in white. It turned out great but I'd like it to be really glossy. Can I apply the same paint but in a gloss over what I've just painted or use a clear high gloss top coat? I'm new to the DIY game and loved your tutorial. I'll definitely be checking out more since I plan to paint my staircase soon.
Erin
Monday 11th of September 2023
Hi Jamie. My guess is that you could add a top coat of some sort. Just be careful that you don't apply something that would yellow over time. I would go into your Benjamin Moore store and ask what they suggest since you used their products. I am glad your tile painting went so well!
Edith
Sunday 10th of September 2023
I have question will the paint sustain the heat of the stove and oven?
Erin
Monday 11th of September 2023
Hi Edith. I can only talk about personal experience and our painted cabinets and tile have held up well. When in doubt, we always recommend heading to your local paint store with specific product recommendations for your specific project.
mary
Wednesday 30th of August 2023
Hi thanks so much for the tutorial. I did it this weekend and it looks great! However, any tiny little touch to the tile and it chips instantly. any solutions to this? it already chipped in a few noticeable areas and it is heart breaking!
mary
Thursday 21st of September 2023
@Erin, Thank you!! I am still extrememly pleased with the results. thank you a million!
Erin
Thursday 31st of August 2023
Hi Mary. Bummer about a few spots. It is hard to say why that would be the case. I wonder if there was grease or something still present that isn't allow the primer to fully adhere. Did you fully cover all areas with primer and allow proper dry time? Did the primer pass the scratch test (meaning it didn't scrape off after it dried). I would let the paint fully dry and then try to touch up (which may include lightly sanding, primer and painting those spots). It can take paint up to 30 days to fully cure. I am sorry I can't be more help as I did not have this issue at all as the primer fully adhered to my tiles. Good luck, I hope you are able to fix those areas.
Charlie
Monday 14th of August 2023
Thank you for easy to follow along with instructions. This detailed information will be used soon on my outdated backsplash.
I’ll send before and after pictures.
Erin
Tuesday 15th of August 2023
Hi Charlie. We would love to see your painted backsplash when you finish. Good luck!
Lori
Saturday 12th of August 2023
Thanks for this article, it was well written, easy to understand, provided tips and tricks and supplies! I can't wit to get started!
Erin
Saturday 12th of August 2023
Hi Lori. Thank you so much for the kind words! I hope your tile painting project turns out well! It is still one of those DIYs that gave us the most bang for our buck!